The holidays have a certain magic — twinkling lights, cozy gatherings, and the scent of something sweet baking in the kitchen. And nothing captures that festive spirit quite like the combination of rich chocolate and refreshing peppermint. That’s where this Candy Cane Brownie Trifle comes in: a show-stopping dessert that looks as stunning as it tastes.
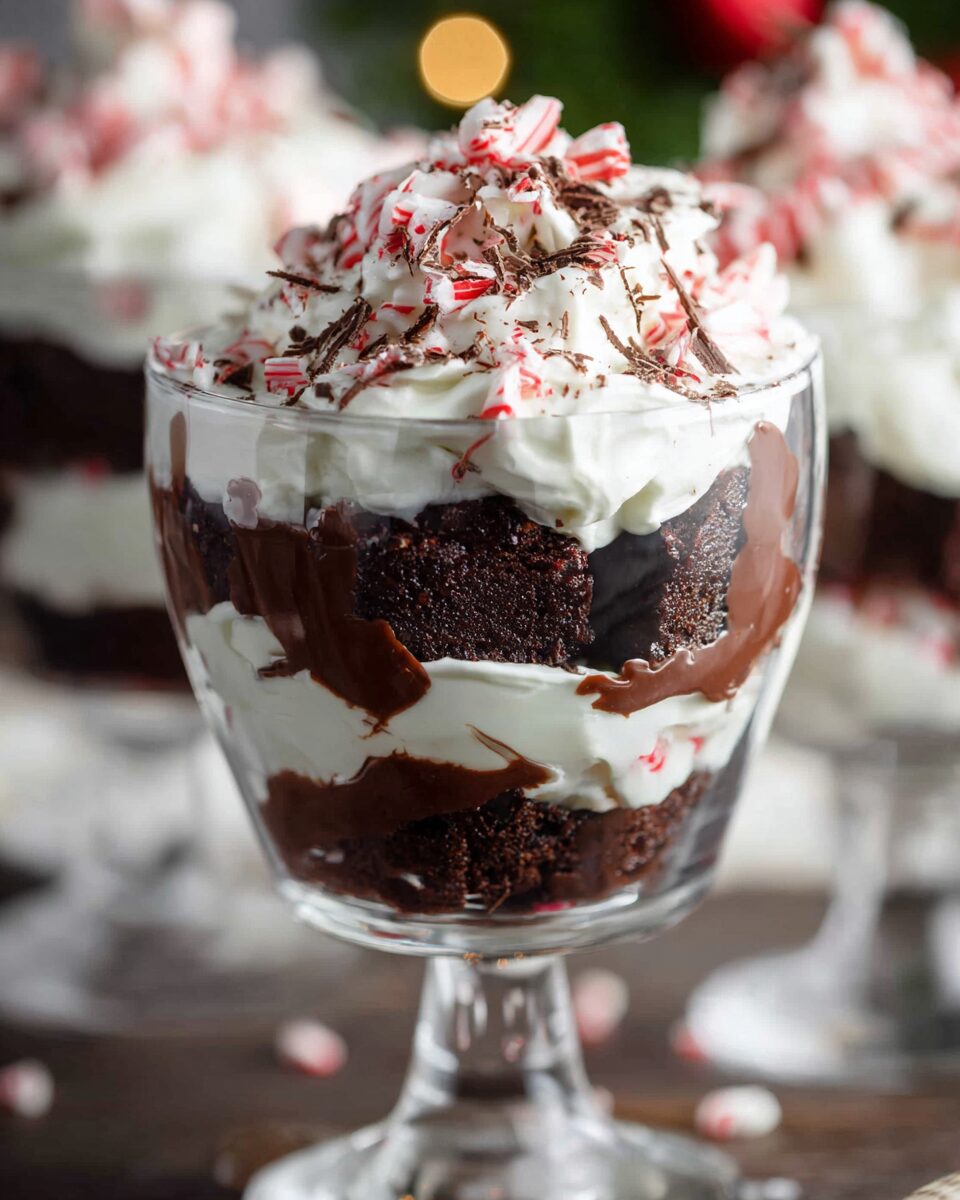
If there were ever a dessert designed to steal the spotlight at a holiday table, this is it. Picture layers of fudgy brownies, cool peppermint cream, chocolate pudding, and crushed candy canes — all beautifully stacked in a glass trifle dish so every layer peeks through in festive color and texture. It’s indulgent, elegant, and surprisingly easy to make.
The first time I made this trifle, it was for a Christmas Eve party at my parents’ house. I had intended to make my usual peppermint bark brownies, but halfway through mixing the batter, I decided to get creative. I baked the brownies as planned, then whipped up a simple peppermint cream and layered everything together with pudding and crushed candy canes. When I brought it to the table, my family’s eyes lit up — and by the end of the night, there wasn’t a spoonful left.
What makes this dessert special is its balance. The brownie provides a dense, chocolatey base, while the whipped cream and pudding add lightness. The candy cane bits bring crunch and a refreshing coolness that perfectly complements the chocolate. It’s festive without being fussy — a little bit nostalgic, a little bit decadent, and entirely irresistible.
Trifles themselves have a long history. Originating in England as far back as the 16th century, traditional trifles were made with sponge cake, custard, fruit, and cream. Over time, bakers and home cooks around the world began creating variations, layering everything from cookies and chocolate to mousse and pudding. Today, the trifle has become a dessert canvas — endlessly adaptable, always impressive, and the perfect make-ahead treat for gatherings.
The Candy Cane Brownie Trifle takes that classic trifle concept and gives it a North Pole makeover. Each layer tells a story — the rich, dark brownie for indulgence; the peppermint whipped cream for freshness; the crushed candy canes for a festive crunch; and the chocolate pudding that ties it all together in luscious harmony.
It’s the kind of dessert that looks like it came straight from a bakery window but feels homemade and comforting. Whether you’re hosting a holiday dinner, attending a potluck, or just craving something festive to share with family, this trifle is the perfect blend of simplicity and sophistication.
Let’s dive into how to make it — layer by layer — so you can bring this stunning dessert to your own holiday table.
Full Recipe
Ingredients
For the Brownie Layer
- 1 cup (226 g) unsalted butter
- 2 cups (400 g) granulated sugar
- 1 cup (120 g) unsweetened cocoa powder
- 1 teaspoon salt
- 1 teaspoon pure vanilla extract
- 4 large eggs, room temperature
- 1 cup (125 g) all-purpose flour
- ½ teaspoon baking powder
Optional: You can substitute homemade brownies with a boxed brownie mix if you’re short on time — just prepare according to package directions.
For the Peppermint Whipped Cream Layer
- 2 cups (480 ml) heavy whipping cream
- ½ cup (60 g) powdered sugar
- ½ teaspoon peppermint extract
- 1 teaspoon pure vanilla extract
- A few drops of red or pink food coloring (optional, for a swirl effect)
For the Chocolate Pudding Layer
- 1 box (3.9 oz / 110 g) instant chocolate pudding mix
- 2 cups (480 ml) cold milk
- ½ cup (120 ml) heavy cream (for extra richness)
For the Garnish
- 6–8 candy canes, crushed (about ½ cup / 50 g)
- Shaved chocolate or mini chocolate chips (optional)
- Whole mini candy canes for decoration
Directions
Step 1: Bake the Brownies
Preheat your oven to 350°F (175°C). Grease a 9×13-inch baking pan or line it with parchment paper.
In a large saucepan, melt the butter over low heat. Once melted, remove from heat and whisk in the sugar, cocoa powder, and salt until combined. Add the vanilla, then whisk in the eggs one at a time until smooth and glossy.
Gently fold in the flour and baking powder until no streaks remain — do not overmix, as that can make your brownies tough instead of fudgy.
Spread the batter evenly into your prepared pan and bake for 22–25 minutes, or until a toothpick inserted in the center comes out with a few moist crumbs (not wet batter).
Allow the brownies to cool completely. Once cooled, cut them into small 1-inch cubes.
Tip: For clean, neat cuts, chill the brownies for 30 minutes before slicing.
Step 2: Make the Chocolate Pudding
In a medium bowl, whisk together the pudding mix, cold milk, and heavy cream for about 2 minutes until smooth and thickened. Let it rest for 5 minutes to set completely.
Using heavy cream instead of all milk gives the pudding a richer, more luxurious texture — perfect for balancing the airy whipped cream layers.
If you prefer homemade pudding, you can make a simple version from scratch using cocoa powder, sugar, cornstarch, and milk — but the instant kind works beautifully and saves time.
Step 3: Prepare the Peppermint Whipped Cream
In a large chilled mixing bowl, pour in the heavy whipping cream. Beat with an electric mixer on medium speed until soft peaks form.
Gradually add powdered sugar, then the peppermint and vanilla extracts. Continue beating until stiff peaks form — the whipped cream should hold its shape but still look silky and smooth.
If you’d like a hint of color, add a few drops of red food coloring and gently swirl with a spatula to create a marbled peppermint effect.
Pro Tip: Do not overbeat! Once the cream turns stiff, stop mixing to prevent it from becoming grainy or buttery.
Step 4: Crush the Candy Canes
Place candy canes in a zip-top bag and crush them with a rolling pin or the bottom of a saucepan. You’re aiming for small chunks — not powder. The mixture of fine dust and crunchy bits adds great texture to each layer.
If you’re making the trifle ahead of time, wait to add crushed candy canes until serving so they stay crisp and don’t melt into the cream.
Step 5: Assemble the Trifle
Now comes the fun part — layering!
In a large glass trifle dish (or 12 individual dessert cups), layer the ingredients as follows:
- Brownie Cubes: Start with a generous layer of brownie pieces at the bottom of the dish. Press them down slightly so they form a firm base.
- Chocolate Pudding: Spoon a thick layer of chocolate pudding over the brownies, spreading it evenly to the edges.
- Peppermint Whipped Cream: Add a layer of whipped cream, spreading it gently with a spatula.
- Crushed Candy Canes: Sprinkle a handful over the whipped cream for that holiday sparkle and crunch.
Repeat the layers until you reach the top of your dish, finishing with a layer of whipped cream.
For the final touch, garnish with extra crushed candy canes, shaved chocolate, or mini candy canes standing upright for decoration.
Tip: If you’re using individual glasses, two layers of each component usually look and serve best.
Step 6: Chill and Serve
Cover the trifle with plastic wrap and refrigerate for at least 2 hours, or overnight if possible.
This chilling time allows the flavors to meld — the brownies soften slightly, absorbing the pudding and cream, while the peppermint infuses its cool, refreshing aroma throughout the dessert.
When you’re ready to serve, use a long spoon to scoop down through all the layers so every serving has a bit of everything — brownie, pudding, cream, and crunch.
Serving Suggestions & Variations
The beauty of a trifle is how versatile it is — you can customize it to your taste, dietary needs, or the occasion. Here are a few ways to make this Candy Cane Brownie Trifle your own:
1. Classic Christmas Trifle (as written)
Rich chocolate, peppermint whipped cream, and candy canes — this is the ultimate festive dessert. Perfect for Christmas parties, potlucks, or family gatherings.
2. White Chocolate Peppermint Trifle
Swap the chocolate pudding for white chocolate pudding or mousse. Add crushed white chocolate peppermint bark for a snowy, elegant twist.
3. Mocha Trifle
Add 1 tablespoon of instant coffee granules to your chocolate pudding for a mocha flavor that pairs beautifully with the peppermint.
4. Gluten-Free Version
Use a gluten-free brownie mix or almond flour brownie base. All the other ingredients — whipped cream, pudding, and candy canes — are naturally gluten-free.
5. Vegan or Dairy-Free Trifle
Use plant-based whipped cream (like coconut or oat-based), almond milk pudding, and dairy-free brownies. You can even find vegan candy canes made without gelatin.
6. Mini Dessert Cups
Serve the trifle in small clear glasses or mason jars for individual servings. Perfect for dinner parties or dessert buffets — plus, they look adorable!
7. Nutty Crunch Variation
Add a sprinkle of crushed peppermint chocolate bark or chopped toasted almonds between layers for added crunch.
8. Kids’ Friendly Twist
Layer with peppermint ice cream instead of pudding for a fun, frozen version. Keep it in the freezer until 15 minutes before serving.
Tips & Tricks
- Use High-Quality Chocolate:
Whether you’re making brownies from scratch or using a mix, good cocoa or chocolate makes a difference. Look for at least 60% cocoa content for richness without bitterness. - Timing is Everything:
Make the trifle a few hours ahead so the layers meld, but don’t add crushed candy canes too early — they’ll melt and lose their crunch. - Keep It Cold:
Always whip cream with cold equipment (chilled bowl and beaters) for the best texture and volume. - Don’t Overmix Layers:
When spreading each layer, use gentle motions to avoid mixing them together — distinct layers make for the best presentation. - Make Ahead:
This trifle can be assembled up to 24 hours in advance (without candy cane topping). Add the crushed candy canes right before serving. - Storage:
Leftovers will keep in the refrigerator for up to 3 days, though the candy canes may soften slightly. Cover tightly with plastic wrap. - Serving for a Crowd:
A standard trifle dish serves about 10–12 people. You can easily double the recipe for larger gatherings. - Decoration Tip:
Add a few whole mini candy canes around the rim of the dish for a charming presentation. Dust with cocoa powder or edible glitter for extra holiday sparkle. - Flavor Balance:
If you prefer a lighter peppermint flavor, reduce the extract slightly. Too much peppermint can overpower the chocolate. - Leftover Hack:
Got leftover brownies or whipped cream? Layer them in jars and freeze for a quick dessert later.
Nutritional Info (Approximate per Serving)
- Calories: 420 kcal
- Total Fat: 25 g
- Saturated Fat: 14 g
- Cholesterol: 85 mg
- Carbohydrates: 45 g
- Sugars: 33 g
- Protein: 5 g
- Sodium: 200 mg
(Based on 12 servings; may vary depending on specific ingredients used.)
Additional Info
- Prep Time: 30 minutes
- Cooking Time: 25 minutes (for brownies)
- Chilling Time: 2 hours
- Total Time: 2 hours 55 minutes
- Servings: 12
- Calories per Serving: ~420 kcal
Final Thoughts
This Candy Cane Brownie Trifle Recipe is everything a holiday dessert should be — beautiful, indulgent, and full of joy. It captures the essence of the season in every spoonful: rich chocolate, cool peppermint, and that satisfying crunch of crushed candy canes.
It’s also a baker’s dream — elegant enough for a Christmas dinner centerpiece, yet simple enough for casual get-togethers. The layers are easy to assemble, forgiving to make, and impossible to resist.
Each bite is a perfect blend of flavors and textures — soft brownie, creamy pudding, airy whipped cream, and the refreshing snap of peppermint. It’s festive without being fussy, decadent without being heavy, and guaranteed to impress anyone who tries it.
So this holiday season, skip the complicated desserts and make something that truly shines — a dessert that celebrates the joy of togetherness, the nostalgia of candy canes, and the comforting sweetness of homemade baking.