There’s something undeniably magical about a charcuterie board. It’s not just food—it’s art, conversation, and indulgence all arranged on a single platter. A beautifully curated board brings people together the way few dishes can. You set it down, and instantly the room comes alive: laughter, reaching hands, glasses clinking, and everyone picking and pairing their favorite combinations.
But beyond the social charm, the charcuterie board has a rich and fascinating history. The word charcuterie comes from the French words chair (meat) and cuit (cooked), literally translating to “cooked meat.” Originally, it referred to the craft of preparing and preserving meats like sausages, pâtés, hams, and terrines. It was born out of practicality and artistry in 15th-century France, when nothing from the animal went to waste, and butchers took pride in their skill to cure, smoke, and season meats to perfection.
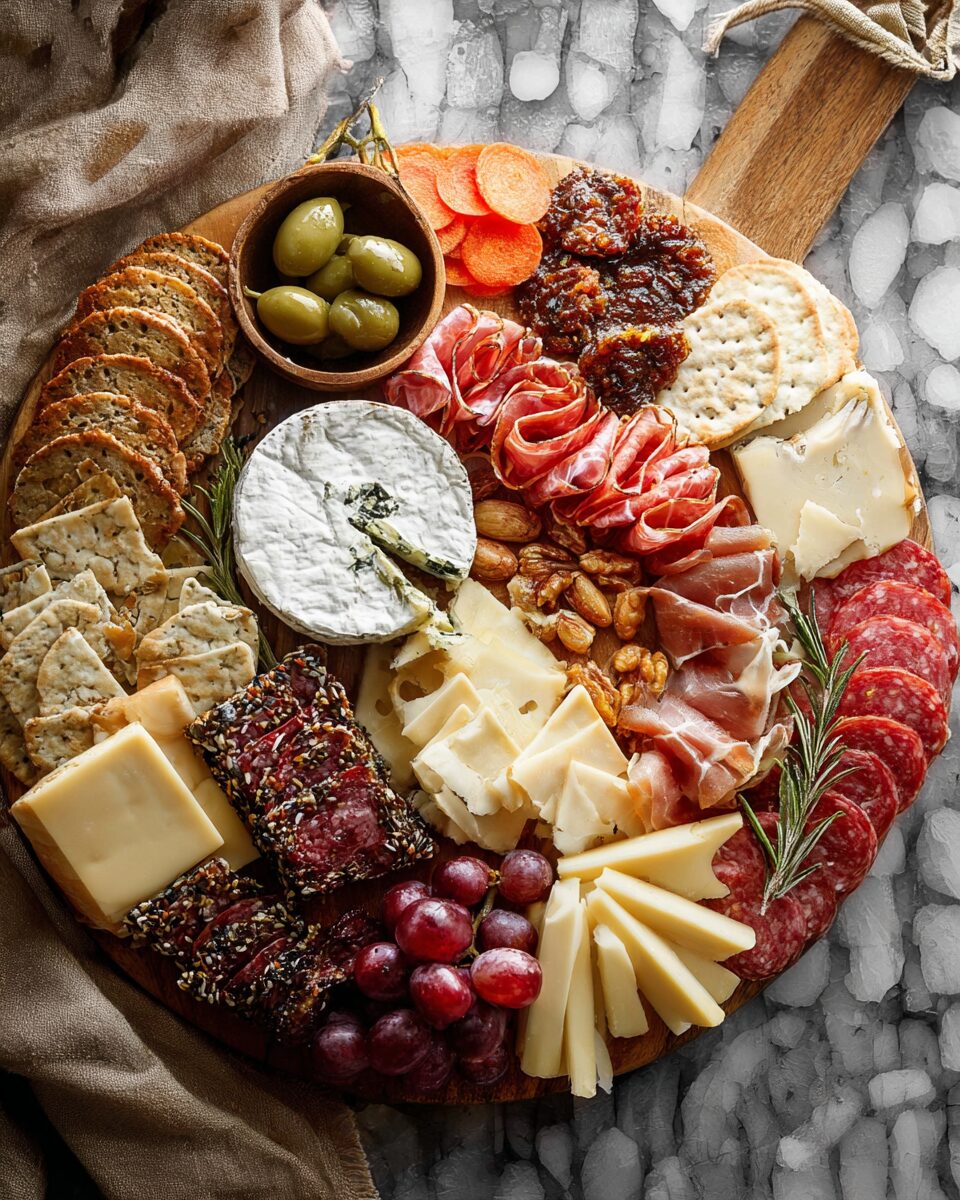
Over the centuries, charcuterie evolved from an artisanal craft into a culinary celebration. Today, it’s more than cured meats—it’s a harmony of textures and flavors: salty, sweet, tangy, creamy, and crunchy. It’s a landscape of cheeses, fruits, nuts, breads, and spreads, all complementing each other in endless ways.
What makes a charcuterie board truly special is its flexibility and creativity. It’s one of those rare dishes that can be effortlessly elegant or casually comforting. Whether you’re hosting a dinner party, having a cozy night in with wine, or celebrating the holidays, a well-designed board feels both luxurious and approachable. You can build it small for two people or grand enough to feed a crowd—and it’s always the centerpiece of the table.
A great charcuterie board tells a story. It might celebrate local cheeses and cured meats, highlight seasonal produce, or represent a theme like Mediterranean flavors or rustic farmhouse simplicity. Each board is unique, reflecting the person who assembles it and the occasion it’s made for.
Personally, I love how making a charcuterie board feels like a creative ritual. There’s an element of design involved—color balance, symmetry, and shape—but also intuition. It’s about contrast and connection: soft with crunchy, mild with bold, creamy with acidic. Every little element has a purpose, and yet nothing is rigid.
In this guide, we’ll walk through how to create The Perfect Charcuterie Board—one that’s visually stunning, deliciously diverse, and full of personality. From choosing the right cheeses and meats to arranging each component beautifully, you’ll learn the art and science behind a board that will wow any guest.
Full Recipe
Ingredients
(Serves 6–8 as an appetizer or 4 as a light meal)
Cured Meats (6–8 oz total)
- 3 oz (85 g) prosciutto, thinly sliced
- 2 oz (60 g) salami (such as Genoa or soppressata)
- 2 oz (60 g) spicy chorizo or pepperoni
- 1 oz (30 g) smoked sausage or capicola
Cheeses (8–10 oz total)
- 3 oz (85 g) soft cheese (brie, camembert, or triple cream)
- 3 oz (85 g) semi-soft cheese (havarti, gouda, fontina, or muenster)
- 2 oz (60 g) hard cheese (aged cheddar, manchego, or parmesan)
- 2 oz (60 g) blue cheese (optional, for bold flavor contrast)
Crackers & Bread (about 2 cups total)
- 1 cup artisanal crackers or crostini
- 1/2 baguette, sliced thin and lightly toasted
- 1/2 cup breadsticks or pretzel crisps
Fruits & Veggies
- 1/2 cup grapes (red or green)
- 1/2 apple, sliced thin
- 1/2 pear, sliced thin
- 1/4 cup dried apricots or cranberries
- 1/4 cup cherry tomatoes or roasted red peppers
- 1/4 cup olives (green or kalamata)
- 2 tablespoons cornichons or small pickles
Nuts & Extras
- 1/4 cup mixed nuts (almonds, pecans, or cashews)
- 2 tablespoons honey or fig jam
- 2 tablespoons grainy mustard or chutney
- Fresh herbs (rosemary or thyme) for garnish
Optional Additions
- 1 oz dark chocolate or chocolate-covered almonds
- Roasted chickpeas or spiced nuts for extra crunch
- Small cubes of marinated feta or mozzarella pearls
Directions
Step 1: Choose Your Board
The first step to building a perfect charcuterie board is selecting the right base. This could be a wooden cutting board, a marble slab, a slate platter, or even a large tray. The size depends on your guest count.
For a cozy evening for two, a small wooden board (around 12 inches) works beautifully. For parties, aim for something larger—16 to 20 inches or more. If you don’t have one big board, combine two smaller ones to create a layered effect.
Pro Tip: Wood adds rustic warmth, while marble feels elegant and keeps cheeses cool longer. Slate is great for labeling your cheeses with chalk!
Step 2: Select Your Cheeses
Cheese is the star of any charcuterie board, so variety is key. Choose three to four types with different textures and flavor profiles:
- Soft: Creamy and spreadable, like brie or camembert. These add richness.
- Semi-Soft: Buttery and mild, like gouda or havarti, to balance the stronger flavors.
- Hard: Sharp and nutty, such as aged cheddar or manchego, for contrast.
- Blue: Tangy and bold, like gorgonzola or Roquefort, for adventurous eaters.
Cut or crumble cheeses in different shapes—wedges, cubes, slices—to add visual interest. Place them in separate corners or zones of your board, leaving space between each type.
Tip: Bring cheeses to room temperature (about 30–45 minutes before serving) to enhance their flavors and textures.
Step 3: Add the Meats
Arrange your cured meats next, fanning or folding slices for an appealing presentation.
- Roll prosciutto into loose ribbons or delicate folds.
- Create salami roses by folding slices around the rim of a small glass.
- Layer chorizo or pepperoni in a curve near the cheeses.
Alternate meats with cheeses to create visual flow and balance salty with creamy elements.
Pro Tip: Keep meats and cheeses close enough that guests can easily build combinations without reaching across the board.
Step 4: Fill in with Crackers & Bread
Crackers and bread provide structure—they’re the vehicles that carry all those delicious bites.
Arrange different varieties around the edges or in clusters near the cheeses. Stand some vertically in small piles and lay others flat to break up the pattern.
You can toast baguette slices lightly with olive oil and herbs for an extra layer of flavor. Pretzel crisps or seeded crackers also add a great crunch and texture contrast.
Tip: Include both plain and flavored crackers so they complement rather than overpower the other ingredients.
Step 5: Add Fruits, Vegetables & Pickled Items
Fruits and veggies bring freshness and color to the board. Choose a mix of sweet and tangy elements to brighten up the rich meats and cheeses.
- Cluster grapes or berries in small bunches for easy grabbing.
- Arrange apple and pear slices in fanned-out patterns.
- Tuck dried fruits like apricots or cranberries near strong cheeses—they pair beautifully with sharp flavors.
- Add olives, cherry tomatoes, and pickles for a burst of acidity that cuts through the richness.
For presentation, distribute colors evenly—don’t group all the dark or bright items together. A visually balanced board is more inviting.
Step 6: Add Nuts, Spreads & Condiments
Now comes the final layer of texture and flavor. Small bowls or ramekins work perfectly for wet or sticky items like honey, mustard, or jam.
- Place honey or fig jam near salty cheeses like blue or cheddar.
- Offer grainy mustard or chutney alongside meats for dipping.
- Scatter nuts (almonds, pecans, pistachios) in open spaces for crunch.
Pro Tip: Avoid overwhelming the board with too many bowls—limit to three at most and use them to anchor the layout visually.
Step 7: Garnish & Final Touches
Once all major elements are in place, it’s time to decorate and refine.
- Add sprigs of rosemary, thyme, or edible flowers for a touch of freshness and fragrance.
- Fill any remaining gaps with extra nuts, berries, or small crackers—no empty space should remain.
- Wipe any smudges or spills before serving to keep it photo-ready.
If serving outdoors or over several hours, cover the board loosely with parchment or beeswax wrap to keep it fresh.
Serving Suggestions & Variations
1. Classic French Charcuterie Board
Highlight traditional French elements like pâté, cornichons, Dijon mustard, brie, and baguette slices. Add a glass of Champagne or dry rosé for the perfect pairing.
2. Mediterranean Mezze Board
Replace cured meats with prosciutto, jamón, or spicy soppressata, and add hummus, marinated artichokes, roasted red peppers, and feta. Serve with pita bread or lavash.
3. Rustic Farmhouse Board
Focus on hearty, robust flavors—aged cheddar, smoked sausage, grainy mustard, pickled onions, and apple slices. Pair with hard cider or an amber ale.
4. Sweet & Savory Dessert Charcuterie
Swap meats for dark chocolate, candied nuts, dried fruit, and brie. Add honeycomb, strawberries, and shortbread cookies for a stunning dessert board.
5. Diet-Friendly Options
- Low-carb: Skip the bread and use cucumber slices or mini bell peppers for scooping.
- Vegetarian: Swap meats for marinated tofu, roasted chickpeas, or plant-based deli slices.
- Vegan: Use vegan cheeses, nut spreads, and roasted veggies for a cruelty-free platter.
Tips & Tricks
Ingredient Selection
- Buy fewer but higher-quality ingredients. A small selection of premium meats and cheeses will always impress more than a cluttered board.
- Choose seasonal produce for the best color and flavor.
Portion Planning
- For appetizers: plan 3–4 oz of cheese and 2–3 oz of meat per person.
- For a full meal: double those quantities.
Make-Ahead Advice
- Assemble dry items (crackers, nuts) ahead of time, but add fresh items like fruits and cheese close to serving.
- You can pre-slice cheeses and store them wrapped in wax paper for up to 24 hours.
Presentation Secrets
- Work in odd numbers (3 cheeses, 5 types of fruits, etc.)—it’s more visually appealing.
- Use contrasting colors and textures side by side to create visual balance.
- Don’t overthink perfection; a slightly rustic, abundant look feels more inviting.
Storage
- Leftovers can be stored separately: wrap cheeses in parchment and refrigerate; meats in airtight containers; crackers in a dry, sealed bag.
Pairing Drinks
- Wine: Try a crisp Sauvignon Blanc, a fruity Pinot Noir, or a sparkling Prosecco.
- Beer: Belgian ales or stouts complement both creamy cheeses and salty meats.
- Non-Alcoholic: Sparkling water with citrus, or apple cider for autumn gatherings.
Nutritional Info (Approx. per Serving)
- Calories: 430 kcal
- Protein: 20 g
- Fat: 28 g
- Carbohydrates: 18 g
- Fiber: 3 g
- Sugars: 8 g
- Sodium: 820 mg
(Values vary depending on ingredient choices.)
Additional Info
- Prep Time: 30 minutes
- Cooking Time: 0 minutes
- Total Time: 30 minutes
- Calories per Serving: ~430 kcal
- Servings: 6–8
Final Thoughts
Creating The Perfect Charcuterie Board is more than just arranging food—it’s an act of hospitality and creativity. It’s about crafting something that looks as beautiful as it tastes, something that encourages connection and delight.
What’s wonderful about charcuterie is that it doesn’t demand precision—there are no strict rules, only guiding principles. It’s endlessly customizable, meaning you can adapt it for any occasion, budget, or dietary need. Want it elegant and refined? Focus on artisanal cheeses, truffle honey, and fine prosciutto. Want it cozy and rustic? Opt for hearty cheddar, smoked meats, and crunchy pickles.
A charcuterie board transforms simple ingredients into an experience—a shared moment of flavor and joy. It’s perfect for gatherings, holidays, or even a self-care night in with wine and music. And each time you build one, it becomes uniquely yours.
So gather your favorite cheeses, meats, fruits, and spreads, and start crafting your masterpiece. Have fun with it, play with colors and textures, and most importantly—enjoy every bite.