There’s something universally comforting about pizza — that melty cheese, the tangy tomato sauce, and the irresistible aroma of warm bread straight from the oven. It’s one of those foods that brings people together, whether it’s a Friday night family dinner, a football game, or a quick lunch between friends. But what if you could take everything you love about pizza and transform it into something bite-sized, easy to share, and even more fun to eat? Enter the Pizza Slider — a handheld twist on the world’s favorite comfort food.
Pizza sliders are the perfect fusion of two beloved dishes: the mini sandwich and the classic pizza. Think of soft, golden dinner rolls brushed with garlic butter, stuffed with layers of gooey mozzarella, zesty marinara sauce, and your favorite pizza toppings — all baked together until hot and bubbly. Each bite delivers that perfect balance of chewy bread, melted cheese, and savory satisfaction.
The beauty of pizza sliders is their versatility. They’re equally at home at a kids’ birthday party, a game-day spread, or a casual weeknight dinner. They’re quick to assemble, easy to customize, and crowd-pleasing to the core. You can make them meaty with pepperoni or sausage, keep them vegetarian with roasted vegetables, or go gourmet with pesto, prosciutto, and arugula.
What makes these sliders truly special is their communal appeal. They’re meant to be shared — served warm on a platter, with cheese stretching between bites, laughter filling the room, and the comfort of good food bringing everyone together. You don’t need a pizza oven, special dough, or fancy tools — just a pack of soft rolls and a few classic ingredients.
The idea for pizza sliders has its roots in American game-day cooking, where convenience meets creativity. Sliders have long been a staple of casual gatherings — easy to grab, fun to eat, and endlessly adaptable. Somewhere along the way, someone realized that all the flavors of pizza could fit perfectly inside a batch of Hawaiian rolls, and a modern classic was born.
The result? A dish that delivers everything you crave about pizza — but with a twist that’s even easier to serve, share, and enjoy. Whether you’re hosting a big crowd or just want a cozy meal at home, pizza sliders are guaranteed to be the first thing to disappear from the table.
Now, let’s roll up our sleeves and create the ultimate Cheesy Pizza Sliders — a recipe so delicious, you’ll wonder why you ever ordered delivery in the first place.
Full Recipe
Ingredients
For the Sliders:
- 1 package (12-count) Hawaiian sweet rolls or soft dinner rolls
- 1 1/4 cups (300 g) pizza sauce or marinara sauce
- 2 cups (200 g) shredded mozzarella cheese
- 1/2 cup (50 g) grated parmesan cheese
- 1 cup (100 g) sliced pepperoni (or other pizza toppings)
- 1/2 cup (50 g) cooked Italian sausage (optional)
- 1/4 cup (40 g) sliced black olives (optional)
- 1/4 cup (40 g) diced bell peppers or onions (optional)
For the Garlic Butter Topping:
- 4 tablespoons (60 g) unsalted butter, melted
- 1 teaspoon garlic powder
- 1 teaspoon dried Italian seasoning
- 1 tablespoon fresh parsley, finely chopped
- 2 tablespoons grated parmesan (for topping)
Optional Add-Ins:
- 1 teaspoon crushed red pepper flakes (for spice)
- 1/4 teaspoon salt (to enhance flavor if using low-sodium sauce)
Directions
Step 1: Prepare the Oven and Pan
Preheat your oven to 375°F (190°C). Grease a 9×13-inch baking dish or line it with parchment paper for easy cleanup.
Pro Tip: If you’re using Hawaiian rolls, don’t separate them individually. You’ll be slicing them as one large block — it makes assembly so much easier and ensures all the sliders bake evenly.
Step 2: Slice the Rolls
Using a long serrated knife, carefully cut the entire batch of rolls horizontally through the middle, creating one large “top” and “bottom” half — just like slicing a bagel. Place the bottom half in your prepared baking dish.
This step is key for keeping your sliders intact. By keeping them connected, you get that signature “pull-apart” experience when they come out of the oven, each one cheesy and gooey but still part of the whole.
Step 3: Spread the Sauce
Spread an even layer of pizza sauce or marinara over the bottom half of the rolls. Don’t skimp — the sauce is what ties everything together. But also don’t overdo it; too much sauce can make the bread soggy.
Tip: If you like a deeper flavor, mix a teaspoon of olive oil and a dash of dried oregano into the sauce before spreading it.
Step 4: Add the Cheese
Sprinkle 1 cup of shredded mozzarella evenly over the sauce. Cheese acts as a delicious glue to hold your toppings in place.
If you’re a cheese lover (and let’s be honest, who isn’t?), mix mozzarella with a handful of shredded provolone or Monterey Jack for extra stretch and creaminess.
Step 5: Add the Toppings
Here’s where you get to have fun and make these sliders your own. Add pepperoni slices, cooked sausage, bell peppers, onions, or olives—whatever your pizza-loving heart desires.
Arrange the toppings evenly so that every slider gets a little of everything. Avoid piling too high; you want to be able to close the top layer without everything sliding off.
Step 6: Layer More Cheese (Because Why Not?)
Sprinkle the remaining 1 cup of mozzarella and 1/2 cup of parmesan over the toppings. This top layer of cheese will melt into the bread above it, creating that perfect gooey pull when you separate the sliders later.
Step 7: Add the Top Half of Rolls
Place the top half of the rolls gently over the cheese layer, aligning it with the bottom half. Press down lightly to help everything hold together.
Step 8: Make the Garlic Butter Topping
In a small bowl, mix together melted butter, garlic powder, Italian seasoning, and parsley. Brush the mixture generously over the tops of the rolls, letting it seep into the cracks.
Sprinkle a little grated parmesan on top for that golden, cheesy finish.
Pro Tip: For even more flavor, add a pinch of red pepper flakes or drizzle a few drops of olive oil on top before baking.
Step 9: Bake to Perfection
Cover the dish with aluminum foil (to prevent the tops from browning too quickly) and bake for 10 minutes. Then remove the foil and bake for another 8–10 minutes, or until the cheese is melted and the tops are golden brown.
The smell at this point will be irresistible — buttery garlic, bubbling cheese, and the unmistakable aroma of pizza filling your kitchen.
Tip: If you like crispier edges, bake uncovered for an additional 2–3 minutes at the end.
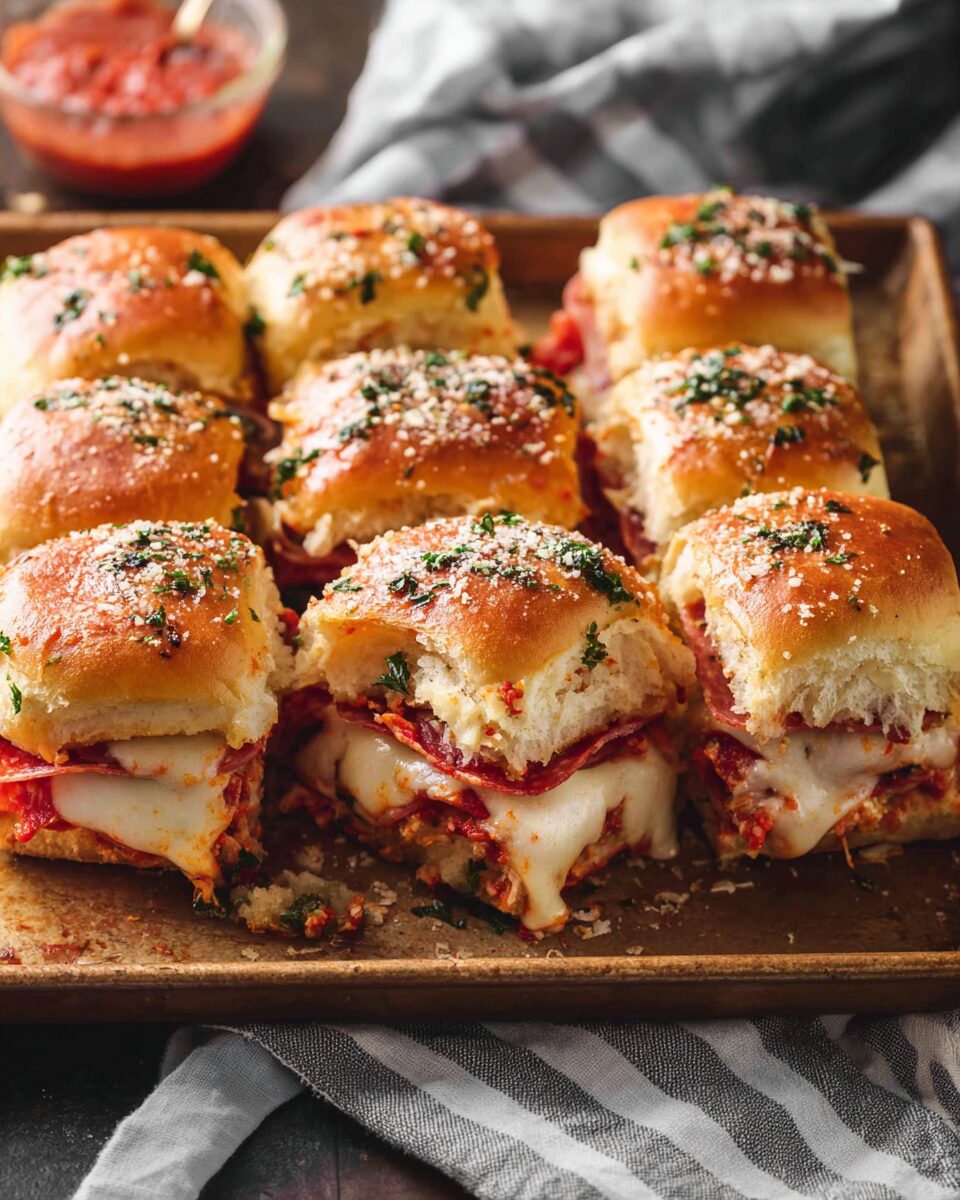
Step 10: Slice and Serve
Remove the sliders from the oven and let them cool for 5 minutes before slicing. Use a sharp knife to cut along the original roll lines to separate each slider.
Serve warm with a side of extra pizza sauce or marinara for dipping.
And there you have it — hot, melty, pull-apart Pizza Sliders that are every bit as satisfying as they look.
Serving Suggestions & Variations
1. Classic Pepperoni Pizza Sliders
Stick with the basics — sauce, mozzarella, and pepperoni. It’s simple, universally loved, and perfect for any gathering.
2. Meat Lover’s Sliders
Add layers of pepperoni, crumbled sausage, ham, and bacon bits for an ultra-hearty version that’s sure to be a hit with carnivores.
3. Veggie Supreme Sliders
Skip the meat and load your sliders with mushrooms, bell peppers, onions, spinach, and black olives. Add a drizzle of pesto or balsamic glaze for a gourmet touch.
4. BBQ Chicken Pizza Sliders
Use barbecue sauce instead of pizza sauce, and fill the sliders with shredded rotisserie chicken, red onions, mozzarella, and cheddar. Finish with fresh cilantro for that sweet-and-smoky twist.
5. Hawaiian Pizza Sliders
Layer ham, pineapple chunks, and mozzarella, then brush the tops with a hint of honey butter before baking. The balance of salty and sweet makes this version irresistible.
6. White Pizza Sliders
Skip the red sauce entirely. Instead, brush the rolls with garlic butter, layer with ricotta, mozzarella, and spinach, and finish with a sprinkle of Italian seasoning.
7. Breakfast Pizza Sliders
Swap marinara for whisked eggs, add crumbled breakfast sausage and cheddar, and bake until golden. Serve with ketchup or spicy mayo for a morning treat.
Tips & Tricks
1. Choosing the Right Bread
- Hawaiian rolls are a fan favorite for their sweetness and pillowy texture, but any soft slider roll works.
- Avoid crusty or dense bread — you want something that stays tender and easy to bite through.
2. Preventing Soggy Sliders
- Toast the bottom half of the rolls for 3–4 minutes before assembling to create a barrier against the sauce.
- Spread the sauce thinly — just enough for flavor without soaking the bread.
3. Make-Ahead Option
- Assemble the sliders up to 8 hours in advance and refrigerate (unbaked). When ready to serve, brush with butter and bake as directed.
- They also reheat beautifully — wrap leftovers in foil and bake at 350°F (175°C) for 10–12 minutes.
4. Freezing Instructions
- Let sliders cool completely, then wrap tightly in foil and freeze for up to 2 months.
- To reheat, bake at 350°F (175°C) for 15–20 minutes or until hot and melty.
5. Customize the Flavors
- Try flavored butters like basil butter or chili-garlic butter for the topping.
- Add fresh herbs like oregano, thyme, or basil between layers for aroma and depth.
6. Serving Ideas
- Serve with sides like Caesar salad, garlic knots, or roasted veggies.
- Pair with a light sparkling soda or beer for a perfect game-day combo.
Nutritional Info (Per Slider – Approximate)
- Calories: 220 kcal
- Protein: 10 g
- Fat: 11 g
- Carbohydrates: 18 g
- Fiber: 1 g
- Sugars: 4 g
- Sodium: 480 mg
(Values will vary based on toppings and type of rolls used.)
Additional Info
- Prep Time: 15 minutes
- Cooking Time: 20 minutes
- Total Time: 35 minutes
- Calories per Serving: ~220 kcal per slider
- Servings: 12 sliders
Final Thoughts
Pizza sliders are the epitome of comfort made simple — a recipe that’s as fun to make as it is to eat. They take the universal love for pizza and reimagine it in a form that’s shareable, customizable, and irresistibly delicious.
What I love most about these sliders is their versatility. They can be casual or elegant, simple or elaborate, kid-friendly or gourmet — it’s all up to you. They’re the kind of dish that invites creativity and connection, perfect for weeknights when you want something easy, or parties when you need a guaranteed crowd-pleaser.
They’re also a great “bridge” dish for family dinners — something everyone agrees on, no matter their age. There’s no stress about who wants what topping, because everyone can grab their favorite. And when that buttery, garlicky aroma fills your kitchen, you’ll know you’ve made something truly special.
So next time you’re craving pizza but don’t want the hassle of dough, give these Cheesy Pizza Sliders a try. They’re quick, satisfying, and absolutely addictive — the kind of recipe you’ll find yourself making again and again.