Every generation seems to have one appetizer that defines an era — something that evokes nostalgia, feels comforting yet festive, and always disappears from the table before the main course arrives. For many of us, that dish is the classic cheese ball with dried beef.
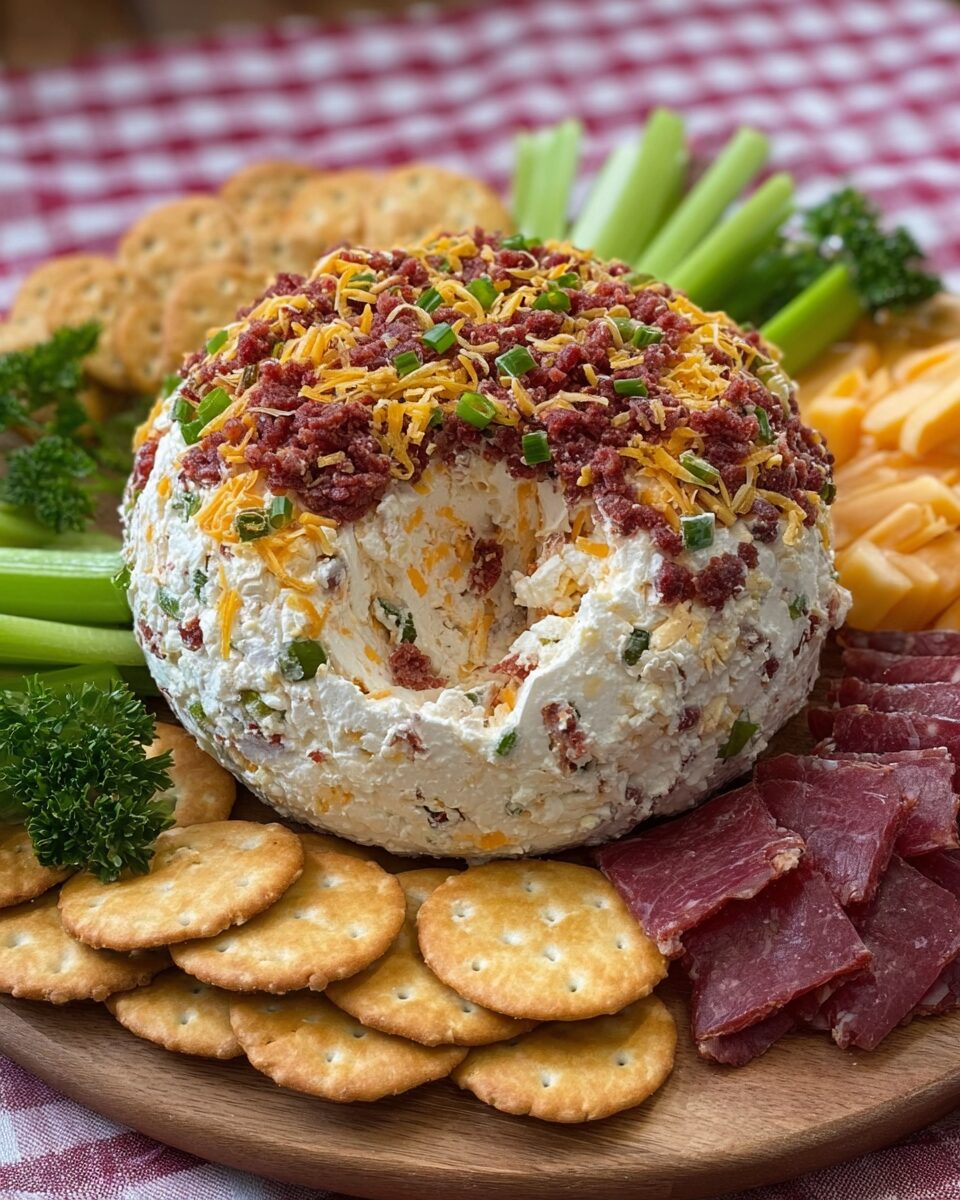
This creamy, savory orb of cheesy goodness wrapped in minced dried beef isn’t just food — it’s tradition. The cheese ball is that quintessential dish that bridges the gap between homey and elegant. You’ll find it at holiday parties in cozy living rooms, at family reunions in small towns, and on polished platters at weddings or church potlucks. It’s a universal favorite because it checks all the right boxes: creamy, tangy, salty, spreadable, and endlessly customizable.
The Origins of the Cheese Ball
The idea of a cheese ball dates back centuries. Early forms appeared in American cookbooks in the late 1800s, but it wasn’t until the mid-20th century — particularly the 1950s and 60s — that the cheese ball became a star appetizer. This was the age of cocktail parties, when homemakers proudly presented their creations alongside martinis and deviled eggs.
Back then, the cheese ball was seen as the height of sophistication — a culinary centerpiece that combined luxury (cream cheese, nuts, and occasionally sherry) with practicality (it could be made ahead of time and served cold).
Our version — the Cheese Ball with Dried Beef — rose to popularity soon after, when creative cooks began experimenting with dried chipped beef, a preserved meat that added rich umami flavor and an easy-to-handle texture. It’s the perfect partner to creamy cheese and aromatic seasonings.
Why This Recipe Matters
This cheese ball is not just a dip — it’s a moment of connection. It’s what you serve when family gathers around the kitchen island or when neighbors stop by unexpectedly during the holidays. It’s humble, but always impressive.
I first learned to make it from my grandmother, who would prepare one days before Christmas Eve and keep it chilled, ready to roll in chopped dried beef just before guests arrived. I can still picture her old wooden mixing bowl, her silver spatula coated in cream cheese, and the scent of Worcestershire and green onions filling the air.
The magic of this cheese ball lies in its simplicity: cream cheese provides a luscious base, cheddar adds a sharp bite, dried beef delivers savory depth, and green onions give that perfect whisper of freshness. Together, they create balance — salty, tangy, creamy, and crunchy all in one.
When to Serve It
While it shines during holidays like Christmas, Thanksgiving, and New Year’s Eve, it’s also perfect for:
- Game nights — paired with crackers and beer.
- Picnics — wrapped in parchment and chilled in a cooler.
- Potlucks — where it’s guaranteed to steal the show.
- Gift baskets — paired with a small knife and a box of artisan crackers.
You can even form smaller versions into mini cheese balls and coat them in herbs or nuts for elegant party snacks.
So whether you’re reviving a vintage recipe or making it for the first time, this cheese ball deserves a place on your table — it’s creamy comfort with a retro soul and a timeless flavor.
Full Recipe
Ingredients
For the Cheese Mixture:
- 2 packages (8 oz each) cream cheese, softened
- 1 cup (about 100 g) shredded sharp cheddar cheese
- 1 jar (2.5 oz / 70 g) dried beef, finely chopped (reserve ¼ cup for coating)
- 2 tablespoons finely chopped green onions (plus extra for garnish)
- 1 teaspoon Worcestershire sauce
- ½ teaspoon garlic powder
- ¼ teaspoon onion powder
- ¼ teaspoon black pepper
- ¼ teaspoon paprika (optional, for color)
For the Coating:
- Remaining ¼ cup chopped dried beef
- 2 tablespoons chopped fresh parsley (optional, for freshness and color)
For Serving:
- Assorted crackers, pretzels, or vegetable sticks (celery, carrot, bell pepper strips)
Directions
Step 1: Prepare the Ingredients
Before you begin mixing, soften the cream cheese by letting it sit at room temperature for about 30–45 minutes. This step is crucial — soft cream cheese blends easily and ensures a smooth, creamy texture.
While waiting, finely chop the dried beef and green onions. For the dried beef, use a sharp knife and cut it into small bits rather than rough chunks. The smaller the pieces, the more evenly the flavor will be distributed.
Tip: Rinse the dried beef briefly under cold water and pat it dry with paper towels to remove excess saltiness.
Step 2: Mix the Base
In a large mixing bowl, add softened cream cheese. Using a rubber spatula or hand mixer, whip it until smooth and creamy. This process incorporates a bit of air, making the final texture lighter and fluffier.
Add shredded cheddar cheese next. The cheddar gives structure and sharp flavor contrast to the mellow cream cheese. Stir thoroughly until evenly combined.
Step 3: Add Flavor Components
Now stir in the chopped dried beef (reserving ¼ cup for later), green onions, Worcestershire sauce, garlic powder, onion powder, black pepper, and paprika. Mix gently but thoroughly.
The Worcestershire adds a subtle tang and umami — it’s what makes the cheese ball taste complex rather than flat. Garlic and onion powder enhance depth, while paprika adds warmth and visual appeal.
Variation Idea: Add a teaspoon of Dijon mustard or a few drops of hot sauce for a more vibrant flavor.
Step 4: Chill and Shape
Once mixed, scrape the mixture into the center of the bowl and shape it into a rough ball. Cover tightly with plastic wrap and refrigerate for at least 2 hours, or ideally overnight. Chilling helps the flavors meld and makes shaping easier.
When ready to serve, unwrap and roll the cheese ball between your palms (you can use disposable gloves) to form a smooth, round shape.
Make-Ahead Tip: The mixture can be made up to 3 days in advance and kept tightly sealed in the fridge.
Step 5: Coat the Cheese Ball
Combine the reserved chopped dried beef and parsley on a large plate or cutting board. Roll the chilled cheese ball gently in the mixture until it’s completely covered.
This outer layer doesn’t just look attractive — it adds texture and that final salty-savory punch. If you prefer a different look, you can use crushed nuts, herbs, or even shredded cheese as an alternative coating (see Variations below).
Step 6: Serve and Enjoy
Transfer the cheese ball to a serving plate or platter. For an elegant touch, sprinkle a few green onion slices on top and add a drizzle of honey for sweet contrast (optional).
Surround it with crackers, pretzels, or crisp vegetables. To make serving easier, set out a small butter knife or cheese spreader so guests can easily scoop and spread.
Entertainer’s Tip: For parties, place the cheese ball on a chilled marble board to keep it cool and fresh longer.
Serving Suggestions & Variations
1. Classic Holiday Cheese Ball
Stick to the recipe as-is for that nostalgic, creamy, savory bite. It pairs perfectly with butter crackers, toasted baguette slices, or even as a filling for celery sticks.
2. Low-Sodium Version
Dried beef can be quite salty. For a lighter version, rinse it thoroughly or substitute with low-sodium turkey bacon, smoked deli ham, or roasted red peppers. Reduce added salt in the recipe accordingly.
3. Spicy Kick Variation
Add 1 finely chopped jalapeño or ½ teaspoon crushed red pepper flakes to the mix. You can also roll the finished ball in crushed chili flakes or peppercorns for a fiery presentation.
4. Herb & Nut Delight
For a more rustic look, coat the cheese ball with a blend of fresh chopped herbs (like parsley, dill, or thyme) and chopped pecans or walnuts. The nuts add crunch while herbs bring freshness.
5. Bacon Ranch Twist
Replace Worcestershire with 1 tablespoon ranch dressing mix, add crumbled bacon, and use shredded Colby Jack cheese instead of cheddar. This version is always a hit at casual gatherings.
6. Mini Cheese Ball Bites
Roll the mixture into smaller, bite-sized balls (about 1 inch each) and coat them with different toppings — dried beef, nuts, herbs, or even shredded cheese — for variety. Stick a pretzel stick into each one for a fun, easy-to-grab snack.
Tips & Tricks
Ingredient Tips
- Cream Cheese: Always use full-fat cream cheese for the best texture. Low-fat versions can make the cheese ball too soft.
- Dried Beef: Brands vary in saltiness; rinse and dry it before chopping to control flavor.
- Cheddar Cheese: A sharp cheddar adds complexity. Avoid pre-shredded cheese if possible — it’s often coated with anti-caking agents that affect texture.
Storage & Make-Ahead
- Store leftover cheese ball tightly wrapped in plastic or an airtight container for up to 5 days in the refrigerator.
- For longer storage, freeze the cheese ball (uncoated) for up to 1 month. Thaw overnight in the fridge, then roll in coating before serving.
Serving Temperature
Serve chilled but not rock-hard. Let it sit at room temperature for 10–15 minutes before serving to soften slightly for easier spreading.
Pairings
Pair your cheese ball with:
- Sparkling wine or crisp cider
- Honey-glazed nuts or dried fruits on the side
- Sliced apples or pears for a sweet-salty combination
What to Avoid
- Don’t overmix the cheese mixture — it can become too soft.
- Avoid adding watery ingredients (like fresh tomatoes or wet veggies) as they can cause the cheese ball to lose shape.
- Don’t coat too early — moisture from the cheese can make the coating soggy. Always roll just before serving.
Nutritional Info (per serving, approx. 2 tablespoons)
- Calories: 110
- Fat: 9 g
- Saturated Fat: 5 g
- Carbohydrates: 1 g
- Protein: 5 g
- Sodium: 190 mg
- Sugar: <1 g
Note: Nutritional values may vary based on ingredient brands and serving size.
Additional Info
- Prep Time: 20 minutes
- Chill Time: 2 hours (minimum)
- Total Time: 2 hours 20 minutes
- Servings: 10–12 (about 2 tablespoons per serving)
- Calories per Serving: 110
Final Thoughts
There’s something truly heartwarming about bringing a Cheese Ball with Dried Beef to the table. It’s not about extravagance — it’s about familiarity. It’s that moment when everyone gathers around, chatting and laughing, while one person inevitably says, “Who made the cheese ball?” and the plate slowly, inevitably, empties.
This recipe is forgiving, flexible, and full of nostalgia. It’s an appetizer that has earned its place in American homes for decades — not because it’s trendy, but because it’s timeless.
Whether you make it for Christmas Eve, a summer picnic, or a quiet night with friends, take a moment to appreciate its humble beauty. Each bite is creamy, tangy, salty, and satisfying — the kind of flavor that brings comfort in every spread.
So, roll up your sleeves, grab that cream cheese, and get ready to create a little edible joy. Serve it with pride, share it generously, and watch as it becomes one of those recipes people ask you for again and again.