Every family has that one appetizer that seems to magically appear at every gathering — the one that vanishes before you can even get your second helping. For some, it’s deviled eggs or stuffed mushrooms. For others, it’s sausage balls or spinach dip. But for me — and for countless families across generations — it’s the Dried Beef Roll-Ups.
These unassuming little rolls might not look like much at first glance, but one bite tells you everything you need to know: creamy, savory, tangy, and utterly addictive. Wrapped in salty, paper-thin dried beef and filled with smooth, seasoned cream cheese, they are the perfect balance of old-fashioned simplicity and irresistible flavor.
They’re the kind of appetizer that feels like home. I can’t remember a single holiday party, potluck, or Sunday afternoon gathering at my grandmother’s house that didn’t feature a plate of them sitting proudly next to the cheese ball and relish tray. She made them with the same care she gave to her main dishes — smoothing each roll, cutting them neatly into bite-sized rounds, and arranging them like little treasures on her favorite floral plate.
A Bit of History
Dried beef — sometimes called chipped beef — has roots that go far back in American culinary history. Originally used as a means of preserving meat without refrigeration, it became a pantry staple during the 20th century, especially in households that valued practicality and flavor. You might recognize it from another retro favorite, Creamed Chipped Beef on Toast, a dish that once graced breakfast tables and army mess halls alike.
But the transformation of dried beef from a hearty breakfast ingredient to a party-perfect appetizer was nothing short of genius. Sometime in the mid-20th century, creative home cooks discovered that pairing salty dried beef with creamy cheese created a flavor marriage that was simply irresistible. Add in a touch of green onion or dill pickle for freshness, and suddenly you had a bite-sized snack that was elegant enough for cocktail parties yet comforting enough for family reunions.
Why This Recipe Endures
There’s something magical about recipes that stand the test of time. Dried Beef Roll-Ups are humble, yes — they use pantry ingredients and take minutes to make — but that’s part of their charm. They don’t rely on fancy tools, expensive ingredients, or complicated techniques.
They embody what old-fashioned entertaining was all about: flavor, fun, and togetherness.
When you place a platter of these on the table, people gather around. They talk, they laugh, and before you know it, the plate is empty. Whether you serve them at a holiday party, a backyard BBQ, or a cozy night in with friends, these roll-ups have that rare ability to bring people together through simple pleasure.
And if you’re new to dried beef, don’t let its old-school reputation fool you — this ingredient is making a quiet comeback in modern cooking. With its deep umami notes and versatility, it’s the perfect canvas for creamy fillings and bold seasonings.
Today’s version of Dried Beef Roll-Ups stays true to its roots while allowing for endless creativity — from herbed cream cheese spreads to spicy jalapeño variations and everything in between.
Full Recipe
Ingredients
For the Roll-Ups:
- 1 jar (2.5 oz / 70 g) dried beef, thinly sliced
- 8 oz (225 g) cream cheese, softened
- 2 tablespoons mayonnaise (optional for extra creaminess)
- 2 tablespoons finely chopped green onions (white and green parts)
- ½ teaspoon garlic powder
- ¼ teaspoon onion powder
- ¼ teaspoon black pepper
- 1 teaspoon Worcestershire sauce (optional but adds depth)
Optional Add-Ins:
- 1 tablespoon chopped fresh parsley or dill (for color and freshness)
- ¼ cup finely diced dill pickles or pimentos (for tang and color)
Directions
Step 1: Soften and Prepare the Cream Cheese
Start by removing the cream cheese from the refrigerator about 30–40 minutes before you plan to use it. This allows it to soften naturally, which makes mixing smoother and helps achieve that velvety texture the filling is known for.
If you’re short on time, you can microwave it for 10–15 seconds, but don’t overheat — you want it pliable, not runny.
Why it matters: Softened cream cheese ensures the mixture spreads easily without tearing the delicate dried beef slices.
Step 2: Prepare the Dried Beef
Remove the dried beef slices from the jar and separate them gently. Sometimes they stick together, so peel them apart carefully.
Next, rinse the slices briefly under cold water and pat them dry with paper towels. This step removes excess salt and prevents the roll-ups from tasting overly briny.
Tip: If you love saltiness, skip rinsing half of the slices and use them for outer layers — that way you get a balanced flavor.
Step 3: Make the Creamy Filling
In a medium bowl, combine softened cream cheese, mayonnaise (if using), green onions, garlic powder, onion powder, pepper, and Worcestershire sauce.
Using a hand mixer or spatula, blend until smooth and creamy. Taste and adjust seasoning — add more green onion for sharpness, Worcestershire for tang, or garlic powder for extra depth.
At this stage, you can also mix in chopped dill or parsley for color, or a few diced dill pickles or pimentos for a zesty touch.
Variation Tip: For a spicy kick, stir in ½ teaspoon of horseradish or a pinch of cayenne pepper.
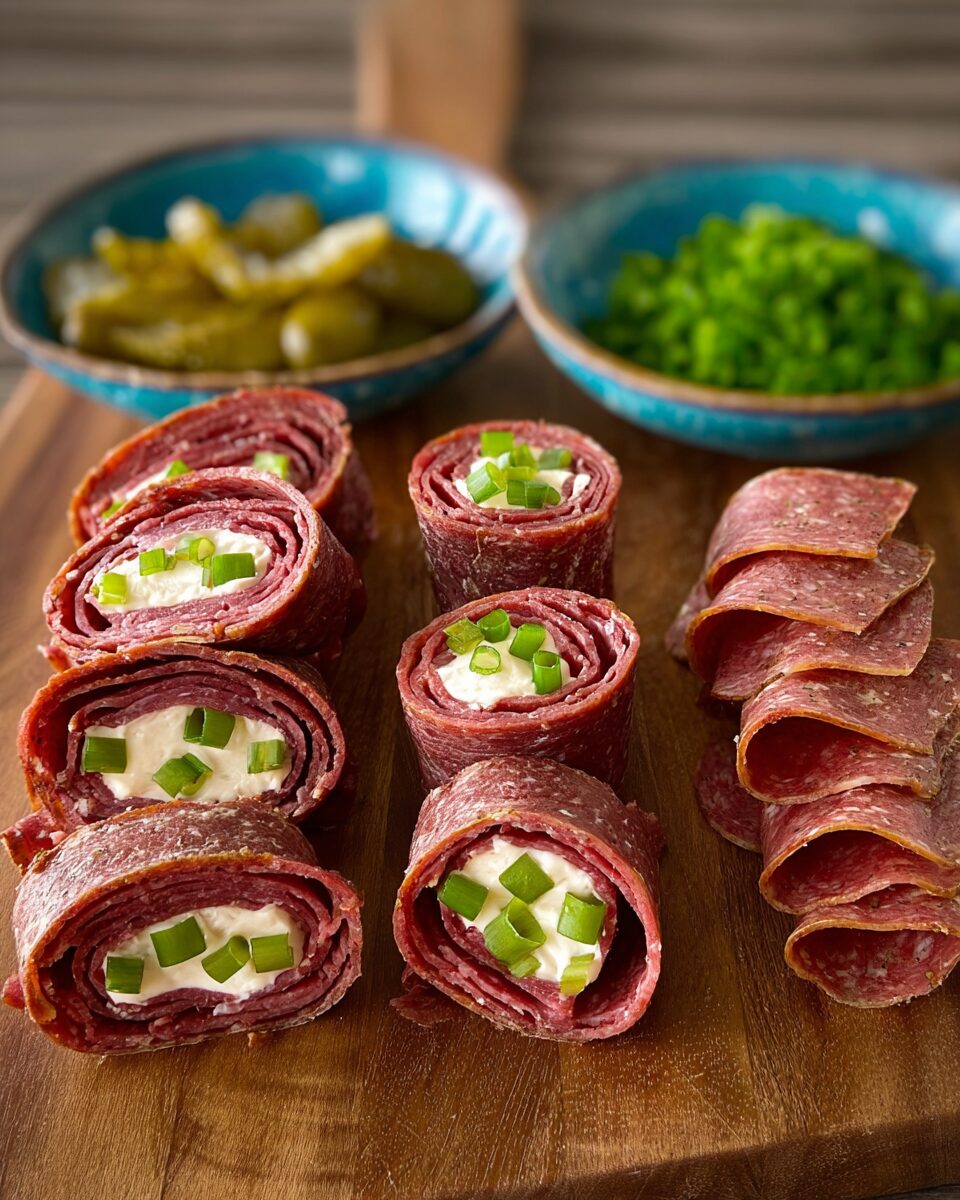
Step 4: Assemble the Roll-Ups
Lay one slice of dried beef flat on a clean cutting board or parchment paper.
Spread a thin, even layer (about 1 teaspoon) of the cream cheese mixture over the entire surface, leaving a small border along one edge to prevent overflow when rolling.
Starting from one short end, roll the beef tightly but gently, like you’re rolling sushi or a tortilla. The goal is to create a snug spiral without squeezing out the filling.
Continue until all slices are filled and rolled. You should end up with about 20–25 small rolls depending on the size of your beef slices.
Technique Tip: If your beef slices are small or irregular, overlap two slightly to form a larger rectangle before spreading the filling — this creates neater, sturdier rolls.
Step 5: Chill and Slice
Place all the finished rolls on a plate or tray, cover tightly with plastic wrap, and refrigerate for at least 1 hour. Chilling helps the cream cheese firm up and keeps the rolls from unraveling when sliced.
Once chilled, use a sharp knife to slice each roll into bite-sized rounds (about ½ to 1 inch thick). Wipe the knife between cuts to keep edges clean.
Arrange on a platter and serve cold.
Make-Ahead Tip: These roll-ups can be made up to 24 hours in advance, making them ideal for parties or potlucks.
Serving Suggestions & Variations
These little bites may be simple, but there are countless ways to dress them up or tailor them to different tastes.
1. Classic Party Platter
Arrange your Dried Beef Roll-Ups in a circular pattern on a vintage platter, sprinkle with chopped parsley or paprika for color, and serve alongside crackers, olives, and cheese cubes. Perfect for retro-themed parties or holiday spreads.
2. Dill Pickle Roll-Ups
Add a thin strip of dill pickle spear before rolling. The crunch and acidity perfectly balance the creamy, salty cheese filling. These are especially popular in the Midwest, often called “Beef Pickle Roll-Ups.”
3. Spicy Jalapeño Version
Mix 1 finely diced jalapeño (seeded) into the cream cheese filling. The heat pairs beautifully with the saltiness of the dried beef.
4. Herb Garden Version
Replace the green onion with a blend of fresh herbs — dill, chives, and parsley — for a bright, garden-fresh flavor.
5. Bacon Lover’s Twist
Add ¼ cup crumbled, cooked bacon into the filling and sprinkle a little smoked paprika over the finished platter. It’s a smoky-salty dream.
6. Low-Sodium Alternative
If dried beef is too salty for your liking, substitute thinly sliced turkey or ham. You’ll still get the same creamy texture with a lighter flavor.
Tips & Tricks
Ingredient Tips
- Cream Cheese: Always use full-fat cream cheese for the best flavor and texture. Low-fat versions tend to release moisture and can make the rolls soggy.
- Dried Beef: Brands vary in saltiness and texture. Buddig and Hormel are popular choices, but rinse regardless to control the salt level.
- Seasonings: Garlic and onion powder provide flavor depth without overpowering. Avoid fresh garlic, which can be too sharp in this uncooked recipe.
Presentation Tips
- For a more elegant look, slice the rolls diagonally and arrange them in a spiral or starburst pattern on your platter.
- Garnish with sprigs of fresh dill or parsley and a sprinkle of paprika for color contrast.
Storage & Make-Ahead
- Store in an airtight container or covered plate for up to 3 days in the refrigerator.
- Do not freeze; cream cheese changes texture when thawed.
- If making ahead, assemble and chill whole rolls, then slice just before serving for the cleanest cuts.
What to Avoid
- Don’t overfill the rolls — too much filling will squeeze out when slicing.
- Avoid using whipped cream cheese; it’s too airy and doesn’t hold its shape well.
- Don’t skip chilling; warm cream cheese will make the rolls messy to cut and serve.
Why These Roll-Ups Are Perfect for Entertaining
In an age of complex appetizers and expensive ingredients, Dried Beef Roll-Ups are refreshingly simple. They require no cooking, minimal prep, and deliver maximum satisfaction.
They’re also endlessly adaptable — you can double the batch for large crowds or tweak the flavor profile depending on the season. During the holidays, add cranberries or chives for festive flair. In summer, include diced bell pepper for a crisp bite.
Because they’re bite-sized, neat, and finger-friendly, they fit right into charcuterie boards and snack platters without any fuss. And perhaps most importantly — they never go out of style.
Nutritional Info (per serving, about 3 roll-ups)
- Calories: 130
- Fat: 11 g
- Saturated Fat: 6 g
- Protein: 6 g
- Carbohydrates: 2 g
- Sugar: 1 g
- Sodium: 390 mg
Note: Nutritional values are approximate and can vary based on ingredient brands and portion sizes.
Additional Info
- Prep Time: 20 minutes
- Chill Time: 1 hour
- Total Time: 1 hour 20 minutes
- Servings: About 25 roll-ups
- Calories per Serving: 130
Final Thoughts
There’s a quiet beauty in recipes like Dried Beef Roll-Ups — the kind that don’t need to shout for attention or rely on fancy ingredients. They speak in comfort and familiarity.
Each bite feels like a connection to something timeless — a reminder of potlucks, holiday parties, and family kitchens where laughter filled the air and platters emptied faster than you could refill them.
So, whether you’re serving them at a holiday gathering, a casual picnic, or just for yourself on a lazy Sunday, these roll-ups bring joy in the simplest, most satisfying way possible.
Creamy, salty, nostalgic, and endlessly snackable — they’re proof that good food doesn’t have to be complicated.
So go ahead — spread, roll, slice, and share. Let this little vintage treasure find its way onto your table and maybe, just maybe, into your family traditions too.