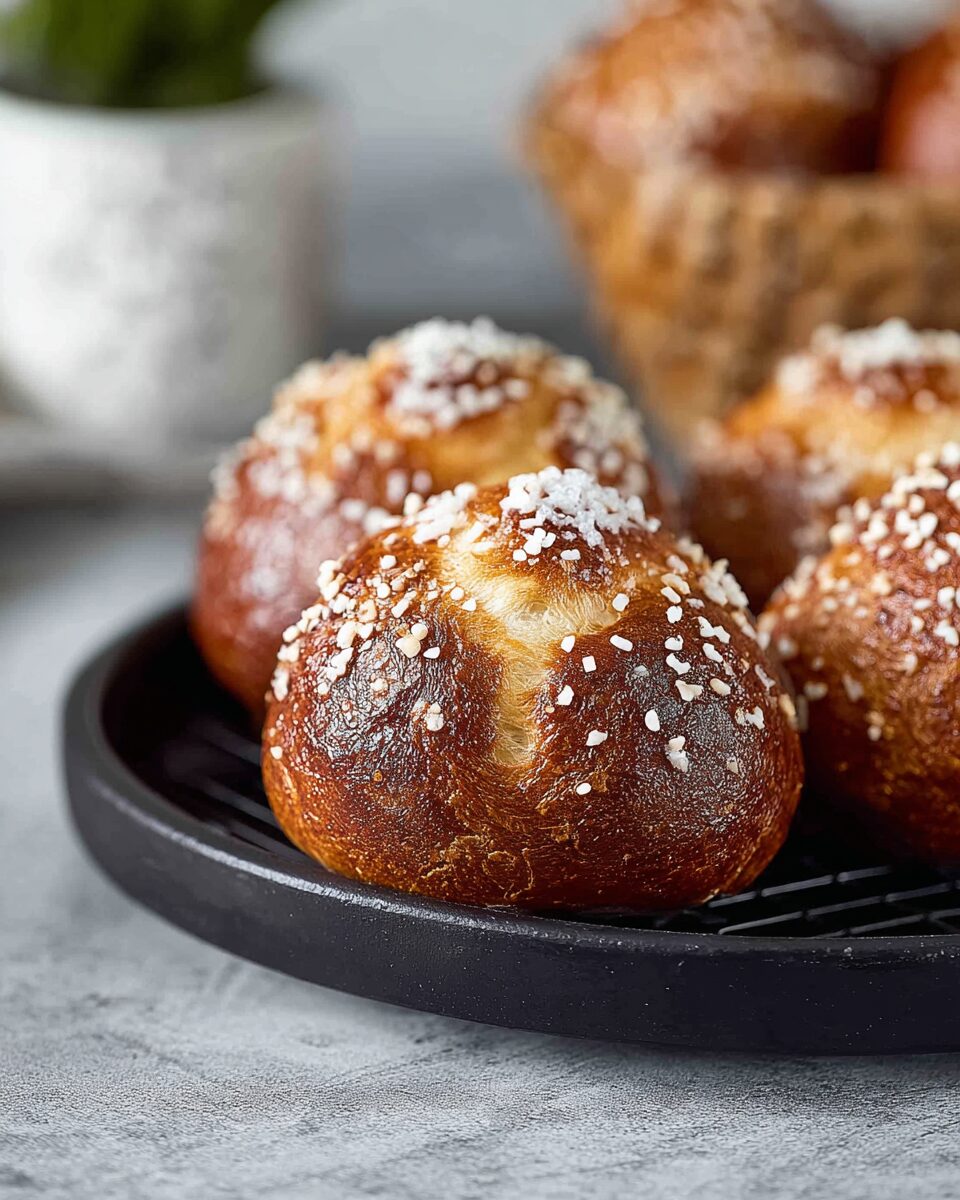
There’s something undeniably comforting about the warm, golden sheen of a freshly baked pretzel roll. The moment you tear one open — revealing its soft, chewy interior — and take that first bite, you’re reminded why pretzels are such a universally loved treat. That balance of a slightly crisp crust, a deep caramel color, and that distinct salty tang makes every bite feel indulgent yet familiar.
Pretzel rolls, sometimes called “pretzel buns,” are the perfect marriage of a classic soft pretzel and a traditional bread roll. Imagine all the goodness of a German-style soft pretzel — chewy, buttery, and beautifully bronzed — reshaped into a roll that’s just as good on its own as it is cradling a juicy burger or piled high with roasted turkey.
Their history traces back to southern Germany and Austria, where pretzels have been baked since the early Middle Ages. The word “Brezel” or “Brez’n” in German describes a baked bread that’s been dipped in a lye solution before baking — a process that gives pretzels their signature flavor and color. It’s said that pretzels were first created by monks as a reward for children who had learned their prayers. The twisted shape represented arms folded in prayer, and their simple ingredients — flour, water, and salt — made them both symbolic and nourishing.
Over time, bakers began experimenting with form. In Bavaria, a region famous for its beer halls and Oktoberfest celebrations, pretzel dough was transformed into rolls — ideal for sandwiches, hearty sausages, and pairing with steins of beer. These rolls became staples at beer gardens, bakeries, and family gatherings. The glossy brown crust and the iconic white cross on top made them instantly recognizable.
Today, pretzel rolls have traveled far beyond Germany’s borders. In the United States, they’ve become a gourmet favorite — showing up in restaurants as burger buns, served with melted cheese dips, or simply enjoyed with butter. But while they look impressive, they’re surprisingly easy to make at home.
What makes pretzel rolls so special is the alkaline bath they take before baking — traditionally made with food-grade lye, though most home bakers use baking soda for safety and convenience. This brief boil in a baking soda solution is what gives pretzel rolls their deep mahogany crust, signature chew, and subtle tangy flavor.
The first time I made these rolls, I remember being mesmerized by the transformation. You start with pale, simple dough balls — nothing fancy at first. But once they hit the boiling water, their surface changes almost immediately, taking on a slick, pretzel-like appearance. Then, as they bake, they puff up, darken, and fill your kitchen with that unmistakable aroma — a little malty, a little buttery, and entirely irresistible.
These rolls have since become a staple in my kitchen. They’re perfect for sandwiches, burgers, or just torn apart warm with butter. My family loves them fresh out of the oven with mustard or honey butter, and they freeze beautifully — making them ideal for meal prep or entertaining.
Whether you’re looking for an impressive side for a dinner party, a homemade twist for burger night, or a nostalgic taste of the bakery, Pretzel Rolls are one of those recipes that deliver comfort, flavor, and craftsmanship in every bite. Let’s dive into how to make them perfectly at home.
Full Recipe
Ingredients
For the Dough:
- 1 ½ cups (360 ml) warm water (about 110°F / 43°C)
- 2 ¼ teaspoons (1 packet / 7 g) active dry yeast
- 2 tablespoons granulated sugar
- 4 cups (500 g) all-purpose flour (plus extra for kneading)
- 2 teaspoons salt
- 4 tablespoons (57 g) unsalted butter, softened
For the Boiling Bath:
- 10 cups (2.4 L) water
- ½ cup (120 g) baking soda
For Topping:
- 1 large egg (for egg wash)
- 1 tablespoon water (to thin the egg wash)
- Coarse sea salt or pretzel salt
Directions
Step 1: Activate the Yeast
In a large mixing bowl (or the bowl of a stand mixer), combine warm water, sugar, and yeast. Stir gently, then let it sit for 5–10 minutes, until it becomes foamy and bubbly.
This step confirms that your yeast is active and ready to leaven the dough. If it doesn’t foam, your yeast may be expired or the water too hot — start again with fresh yeast.
Step 2: Mix the Dough
Once your yeast is activated, add the softened butter, salt, and flour to the bowl. Begin mixing with a dough hook (or by hand with a wooden spoon) until a rough dough forms.
Knead on medium speed for about 6–8 minutes (or by hand for 10 minutes), until the dough becomes smooth, elastic, and slightly tacky but not sticky.
If it feels too wet, sprinkle in more flour, 1 tablespoon at a time.
Pro Tip: The kneading process builds gluten — the network that gives pretzel rolls their chewy texture. Don’t rush this step! A properly kneaded dough will stretch without tearing when pulled gently between your fingers.
Step 3: First Rise
Form the dough into a ball and place it in a lightly greased bowl. Cover with plastic wrap or a damp towel and let rise in a warm place until doubled in size — about 1 to 1½ hours.
You’ll know it’s ready when you poke it gently and the indentation slowly bounces back.
Step 4: Shape the Rolls
Punch down the dough to release excess air. Turn it out onto a lightly floured surface and divide it into 8 equal pieces (for large sandwich rolls) or 12 smaller rolls (for dinner rolls).
Shape each piece into a smooth ball by pulling the edges underneath and pinching the seam at the bottom. The surface should be taut and smooth.
Place the shaped rolls on a parchment-lined baking sheet, seam side down. Cover lightly with a towel and let rest for 15–20 minutes while you prepare the water bath.
Step 5: Prepare the Baking Soda Bath
In a large pot, bring 10 cups of water to a gentle boil. Carefully add the ½ cup of baking soda — the water will foam up, so pour slowly.
This alkaline bath is the secret to that deep, brown crust and distinct pretzel flavor. The baking soda raises the pH level of the dough’s surface, allowing it to brown quickly in the oven.
Note: While traditional bakers use lye for authenticity, baking soda provides excellent results without the safety concerns of handling caustic chemicals.
Step 6: Boil the Rolls
Preheat your oven to 425°F (220°C).
Carefully place 2–3 rolls into the simmering water at a time. Boil for 30 seconds per side, turning gently with a slotted spoon or spatula.
Don’t overcrowd the pot — too many rolls will drop the water temperature and affect the texture.
After boiling, place the rolls back on the parchment-lined sheet, seam side down.
Step 7: Score and Salt
Using a sharp knife or bread lame, cut a shallow cross or “X” on top of each roll. This allows steam to escape and helps the rolls expand evenly during baking.
Brush each roll with egg wash (1 beaten egg mixed with 1 tablespoon water) to give them a glossy, golden finish. Sprinkle with coarse sea salt or pretzel salt.
Pro Tip: Avoid over-salting — just a pinch per roll gives you that signature pretzel bite without overpowering the flavor.
Step 8: Bake to Perfection
Bake the rolls for 14–16 minutes, or until they’re deep golden brown and firm to the touch.
If baking two trays, rotate them halfway through to ensure even browning.
When you tap the bottom of a roll, it should sound hollow — a sign that it’s fully baked.
Step 9: Cool and Enjoy
Remove the rolls from the oven and transfer to a wire rack. Brush with melted butter (optional but highly recommended!) for a soft sheen and richer flavor.
Let cool for at least 10 minutes before serving. These rolls are best enjoyed slightly warm, with butter melting into the cracks.
Serving Suggestions & Variations
Pretzel rolls are wonderfully versatile — they can be the star of your meal or the perfect supporting act. Here are some ways to enjoy them:
1. Classic Sandwich Rolls
Use them as burger buns or sandwich rolls. Their sturdy texture holds up beautifully to juicy fillings like roast beef, turkey, pulled pork, or even veggie burgers.
2. Mini Dinner Rolls
Shape smaller rolls for dinner service. They pair perfectly with soups, stews, or chili. Serve with salted butter, honey butter, or mustard for dipping.
3. Cheese-Stuffed Pretzel Rolls
Before shaping, flatten each dough ball slightly and add a cube of cheese (like cheddar or mozzarella). Pinch the seams tightly, then boil and bake as usual. The result? Melted, gooey centers inside a chewy crust.
4. Garlic & Herb Pretzel Rolls
After baking, brush with garlic butter and sprinkle with fresh herbs like rosemary or parsley. Ideal as a savory side for pasta or roasted chicken.
5. Sweet Cinnamon Pretzel Rolls
Skip the salt topping and instead brush baked rolls with butter and toss in a cinnamon-sugar mix. Drizzle with caramel or vanilla glaze for a dessert-worthy treat.
6. Vegan Pretzel Rolls
Replace butter with plant-based margarine and skip the egg wash (use a brush of olive oil or plant milk for shine). They’ll still bake up beautifully brown and chewy.
Tips & Tricks
Use Bread Flour for Chewier Rolls
If you want a denser, chewier texture, replace half or all of the all-purpose flour with bread flour. The extra gluten gives that classic pretzel chew.
Don’t Skip the Boil
The baking soda bath is what transforms basic dough into pretzel dough. Skipping it will result in regular rolls without that distinct pretzel crust or flavor.
Avoid Overproofing
Letting the dough rise too long can make the rolls collapse after boiling. Stick to about 1–1½ hours for the first rise and 15–20 minutes for the second rest.
Scoring Helps the Rolls Expand
Cutting an “X” or slit on top prevents the rolls from cracking randomly in the oven. It also creates that iconic pretzel appearance.
Storing
Pretzel rolls are best the day they’re baked but will keep for up to 3 days in an airtight container. To reheat, warm in a 350°F (175°C) oven for 5–7 minutes or toast lightly.
Freezing
Cool completely before freezing. To serve, thaw at room temperature and reheat in the oven. They’ll taste freshly baked!
Make-Ahead
You can prepare the dough the night before and refrigerate after shaping. The next day, let them rest at room temperature for 30 minutes before boiling and baking.
Nutritional Info (Per Roll)
- Calories: 240 kcal
- Fat: 7 g
- Carbohydrates: 36 g
- Protein: 6 g
- Sugar: 2 g
- Fiber: 1 g
- Sodium: 420 mg
(Values are approximate and will vary based on portion size and toppings.)
Additional Info
- Prep Time: 20 minutes
- Rising Time: 1½ hours
- Cooking Time: 20 minutes
- Total Time: 2 hours 10 minutes
- Servings: 8 large rolls or 12 small rolls
- Calories per serving: ~240 kcal
Final Thoughts
There’s something deeply satisfying about baking Pretzel Rolls from scratch. Watching them transform from simple dough to glossy, golden perfection feels a bit like magic. The aroma that fills your kitchen — warm, yeasty, buttery — is enough to make anyone wander in for “just one more.”
These rolls bridge the gap between artisan bread and comfort food. They’re rustic yet elegant, hearty yet soft. Whether you serve them as burger buns at a summer cookout, as dinner rolls at a cozy family meal, or simply as an afternoon snack with butter and mustard, they’ll always steal the spotlight.
The beauty of pretzel rolls lies in their versatility — and their ability to make everyday meals feel a little more special. They remind us that baking doesn’t need to be complicated to be rewarding. With a few basic ingredients, a little patience, and the magic of that baking soda bath, you can create something that looks bakery-worthy and tastes even better.
So, go ahead — roll up your sleeves, grab your whisk, and let your kitchen smell like a Bavarian bakery. Once you’ve baked your first batch of Soft & Chewy Pretzel Rolls, you’ll find yourself making them again and again — for sandwiches, burgers, or simply for the joy of tearing one open and enjoying it warm with butter.
Because sometimes, happiness really does come in the shape of a golden, salty, homemade pretzel roll.