There’s something profoundly comforting about the smell of sizzling rissoles filling the kitchen — that nostalgic blend of browned onions, savory meat, and rich gravy simmering slowly on the stove. For many Australians and Brits, rissoles are more than just a dish — they’re a tradition, a taste of home, and a reminder of simpler times when family meals were about gathering around the table and sharing something hearty and made with love.
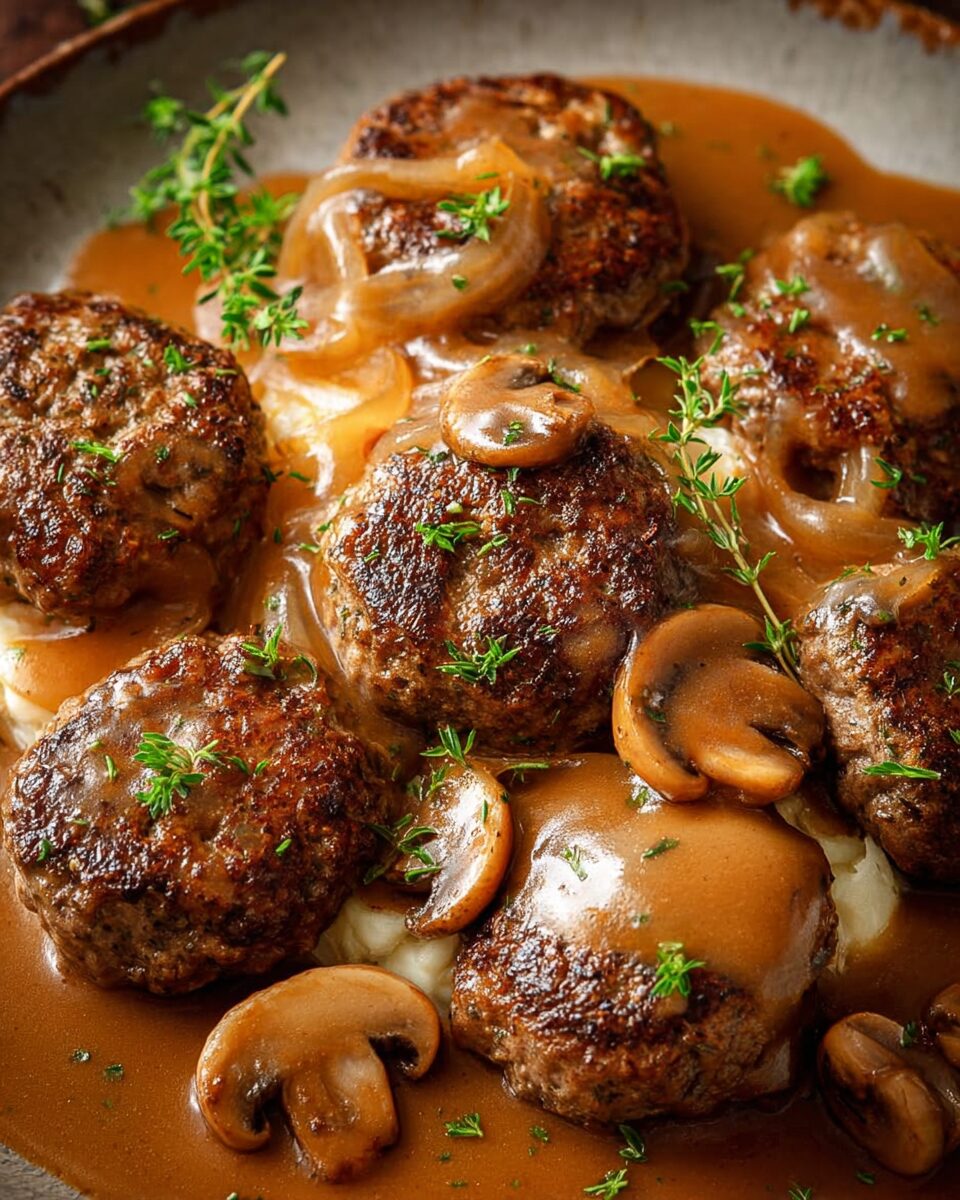
Smothered rissoles take this humble comfort food to the next level. Imagine tender, juicy meat patties — perfectly seasoned with herbs, onion, and breadcrumbs — gently pan-seared until golden, then smothered in a rich, flavorful onion gravy that soaks into every bite. It’s the kind of dish that wraps you in warmth, the culinary equivalent of a big, cozy hug.
A Bit of History and Heart
The word rissole comes from the French “rissoler,” meaning “to brown.” Traditionally, rissoles were made with minced meat or leftovers, coated in breadcrumbs, and fried until crisp. Over time, the dish evolved differently across regions. In France, you might find dainty pastry-wrapped rissoles; in Australia and the UK, they’re closer to a rustic meat patty — somewhere between a hamburger and a meatball — cooked without the bun, often served with mashed potatoes, peas, and gravy.
In post-war Australia, when frugality ruled the kitchen, rissoles became a staple. Families would stretch minced meat with breadcrumbs, grated vegetables, or mashed potatoes to make it feed more mouths. The result wasn’t just practical — it was delicious. Even now, rissoles remain a beloved weeknight meal, often served with creamy mashed potatoes, buttery peas, and a generous pour of gravy.
The smothered version takes things a step further — after the rissoles are browned, they’re finished in a luscious onion gravy that infuses every mouthful with deep, savory flavor. It’s the kind of meal that fills your home with the smell of caramelized onions and slow-cooked comfort.
This recipe captures everything that’s wonderful about home cooking — affordable ingredients, simple methods, and maximum comfort. Whether you’re making it for Sunday dinner or as a midweek pick-me-up, Smothered Rissoles are sure to become a repeat favorite.
Full Recipe
Ingredients
For the Rissoles
- 500 g (1.1 lb) ground beef (or a mix of beef and pork for richer flavor)
- ½ cup breadcrumbs (panko or plain)
- 1 small onion, finely grated
- 1 small carrot, grated (optional, for sweetness and moisture)
- 1 clove garlic, minced
- 1 large egg
- 1 tablespoon Worcestershire sauce
- 1 teaspoon Dijon or yellow mustard
- 1 tablespoon finely chopped parsley (or dried parsley, optional)
- 1 teaspoon salt
- ½ teaspoon black pepper
- 2 tablespoons milk or water (for moisture)
- 2 tablespoons vegetable oil or butter (for frying)
For the Onion Gravy
- 2 tablespoons butter
- 1 tablespoon olive oil
- 2 large onions, thinly sliced
- 1 teaspoon sugar (helps caramelize the onions)
- 1 tablespoon plain flour (all-purpose)
- 2 cups beef stock (500 ml)
- 1 tablespoon Worcestershire sauce
- 1 teaspoon soy sauce (optional, for color and umami)
- ½ teaspoon black pepper
- Salt to taste
- Fresh thyme (optional, for a herby note)
Optional Additions
- ½ teaspoon smoked paprika (adds a subtle smoky note to the rissoles)
- ½ teaspoon chili flakes (for gentle heat)
- Splash of red wine in the gravy for richness
Directions
Step 1: Prepare the Rissole Mixture
In a large bowl, combine the ground beef, breadcrumbs, grated onion, carrot, garlic, egg, Worcestershire sauce, mustard, parsley, salt, pepper, and milk.
Use your hands to gently mix everything together until just combined. Be careful not to overmix — doing so can make the rissoles dense instead of tender. The mixture should be soft but hold its shape.
Tip: If the mixture feels too wet, add an extra tablespoon of breadcrumbs. If it feels dry, add a small splash of milk.
Step 2: Shape the Rissoles
Divide the mixture into equal portions (about 6–8, depending on your preferred size). Roll into balls, then flatten gently into thick patties — roughly ¾ inch (2 cm) thick. Place them on a tray and refrigerate for 15–20 minutes to firm up. This helps the rissoles hold together while frying.
Step 3: Brown the Rissoles
Heat the oil or butter in a large skillet over medium-high heat. Add the rissoles in batches — avoid overcrowding the pan so they brown evenly. Cook for about 3–4 minutes per side, or until golden brown and caramelized.
You don’t need to cook them all the way through at this stage; they’ll finish cooking later in the gravy. Remove from the pan and set aside on a plate.
Pro Tip: Don’t move the rissoles too soon — letting them sear undisturbed creates that delicious crust which locks in moisture and flavor.
Step 4: Make the Onion Gravy
Using the same skillet (don’t clean it — those browned bits are flavor gold!), add the butter and olive oil. Once melted, toss in the sliced onions and sprinkle over the sugar.
Cook over medium heat for about 8–10 minutes, stirring occasionally, until the onions become soft, golden, and caramelized. Take your time here — this step builds the base of the entire dish.
Sprinkle the flour over the onions and stir well, coating them evenly. Cook for 1–2 minutes to remove the raw flour taste.
Gradually pour in the beef stock, stirring constantly to avoid lumps. Add the Worcestershire sauce, soy sauce (if using), and a few grinds of black pepper. Stir and bring to a gentle simmer — the gravy will begin to thicken and turn beautifully glossy.
Taste and adjust seasoning as needed. If you like, add a few sprigs of fresh thyme for aroma or a splash of red wine for extra depth.
Step 5: Smother the Rissoles
Once the gravy is simmering, return the browned rissoles to the pan, nestling them gently into the gravy. Spoon some of the onion sauce over each rissole.
Cover the pan with a lid and let everything simmer on low heat for 15–20 minutes, or until the rissoles are cooked through and tender. The gravy will thicken and absorb some of the meat’s juices, becoming rich, savory, and irresistible.
Tip: If the gravy becomes too thick, stir in a little hot water or extra stock. If it’s too thin, remove the lid and simmer uncovered for a few minutes.
Step 6: Serve and Enjoy
Once the rissoles are cooked and the gravy is silky, it’s time to serve! Spoon them over creamy mashed potatoes or fluffy rice, ladle over plenty of that luscious onion gravy, and add a side of buttered peas, green beans, or roasted carrots.
Top with a sprinkle of fresh parsley for color — then dig in while it’s hot and comforting.
Serving Suggestions & Variations
1. Classic Aussie Style
Serve smothered rissoles with mashed potatoes and green peas — it’s the most nostalgic and beloved way. Add tomato sauce or chutney on the side for extra tang.
2. Rustic Country Dinner
Pair with roasted potatoes, caramelized carrots, and buttered cabbage. Drizzle extra gravy over everything for the ultimate Sunday dinner feel.
3. Modern Healthier Twist
Use lean minced turkey or chicken instead of beef for a lighter option. Serve with cauliflower mash or brown rice to reduce calories without losing comfort.
4. Vegetarian Rissoles
Swap the meat for a mixture of lentils, mushrooms, and breadcrumbs. Cook them the same way and serve with mushroom gravy — rich and earthy, yet completely meat-free.
5. Italian-Inspired Rissoles
Mix parmesan, garlic, and herbs like basil and oregano into the meat. Serve with tomato-based sauce instead of gravy and top with a sprinkle of mozzarella.
6. Spicy Smoky Version
Add a teaspoon of smoked paprika, chili flakes, or even barbecue sauce to the rissole mix. Pair with sweet potato mash and a spicy onion gravy for bold flavor.
Tips & Tricks
- Keep the Mixture Moist:
The combination of onion, breadcrumbs, and milk ensures juicy rissoles. Avoid overcooking them to keep them tender. - Rest Before Frying:
Letting the patties rest in the fridge helps them firm up and prevents them from breaking apart when frying. - Choose the Right Meat:
A blend of beef and pork (80/20 lean-to-fat ratio) yields the best flavor and moisture. Too lean, and they can turn dry. - Build Flavor Layers:
Don’t rush caramelizing the onions — they’re the soul of the gravy. The deeper their color, the richer the taste. - Make Ahead Friendly:
You can prepare the rissoles and gravy up to a day ahead. Reheat slowly on the stove, adding a splash of stock if needed. - Freezer Friendly:
Uncooked rissoles freeze beautifully. Lay them flat on a tray, freeze, then transfer to a bag. Cook from frozen, adding 5–7 minutes to simmering time. - Leftover Magic:
Slice leftover rissoles and serve them in sandwiches or wraps with leftover gravy and coleslaw. They make a fantastic next-day lunch. - Avoiding Greasiness:
Drain the browned rissoles briefly on paper towels before smothering in gravy if you used high-fat meat.
Nutritional Info (Approximate per serving)
- Calories: 480 kcal
- Protein: 28 g
- Fat: 26 g
- Carbohydrates: 28 g
- Fiber: 2 g
- Sugar: 6 g
- Sodium: 720 mg
(Values will vary depending on ingredients and portion sizes.)
Additional Info
- Prep Time: 20 minutes
- Cooking Time: 40 minutes
- Total Time: 1 hour
- Calories per Serving: ~480 kcal
- Servings: 4
Final Thoughts
There’s a reason smothered rissoles hold a special place in so many hearts — they’re the perfect example of simple food done right. Humble ingredients, minimal effort, and maximum comfort. Each bite delivers juicy meat wrapped in velvety gravy, the sweetness of onions balancing beautifully with the savoriness of beef and Worcestershire sauce.
This dish speaks to the heart of family cooking — honest, nourishing, and made to be shared. Whether you’re serving it on a chilly night when everyone gathers around the dinner table or cooking ahead for busy weekdays, it’s one of those meals that never fails to satisfy.
If you grew up with rissoles, making this version will feel like coming home. If it’s your first time trying them, prepare to discover why this classic has stood the test of time. It’s cozy, flavorful, and adaptable — the kind of dish you’ll want to pass down through generations.
So go ahead — grab a pan, caramelize those onions, and smother your rissoles in love (and gravy). Then sit back, take that first bite, and let every mouthful remind you why the simplest meals are often the most memorable.