There’s something irresistibly joyful about biting into a warm donut — that moment when your teeth sink into a soft, pillowy dough and you’re greeted with a creamy, decadent filling that melts across your tongue. Among all the varieties of filled donuts — from classic custard to raspberry jam — nothing quite compares to Nutella stuffed donuts. They combine the comforting sweetness of homemade dough with the rich, nutty allure of everyone’s favorite chocolate hazelnut spread.
Nutella has long been a staple in many kitchens around the world, and for good reason. Originally created in Italy in the 1940s, Nutella was a brilliant solution to a cocoa shortage. Pietro Ferrero, a pastry maker from Piedmont, stretched limited chocolate supplies by blending cocoa with hazelnuts and sugar. The result was something so delicious that it evolved into the global icon we know today. From spreading it on toast to swirling it into desserts, Nutella is now a universal comfort food — and when it finds its way into a freshly fried donut, the result is pure bliss.
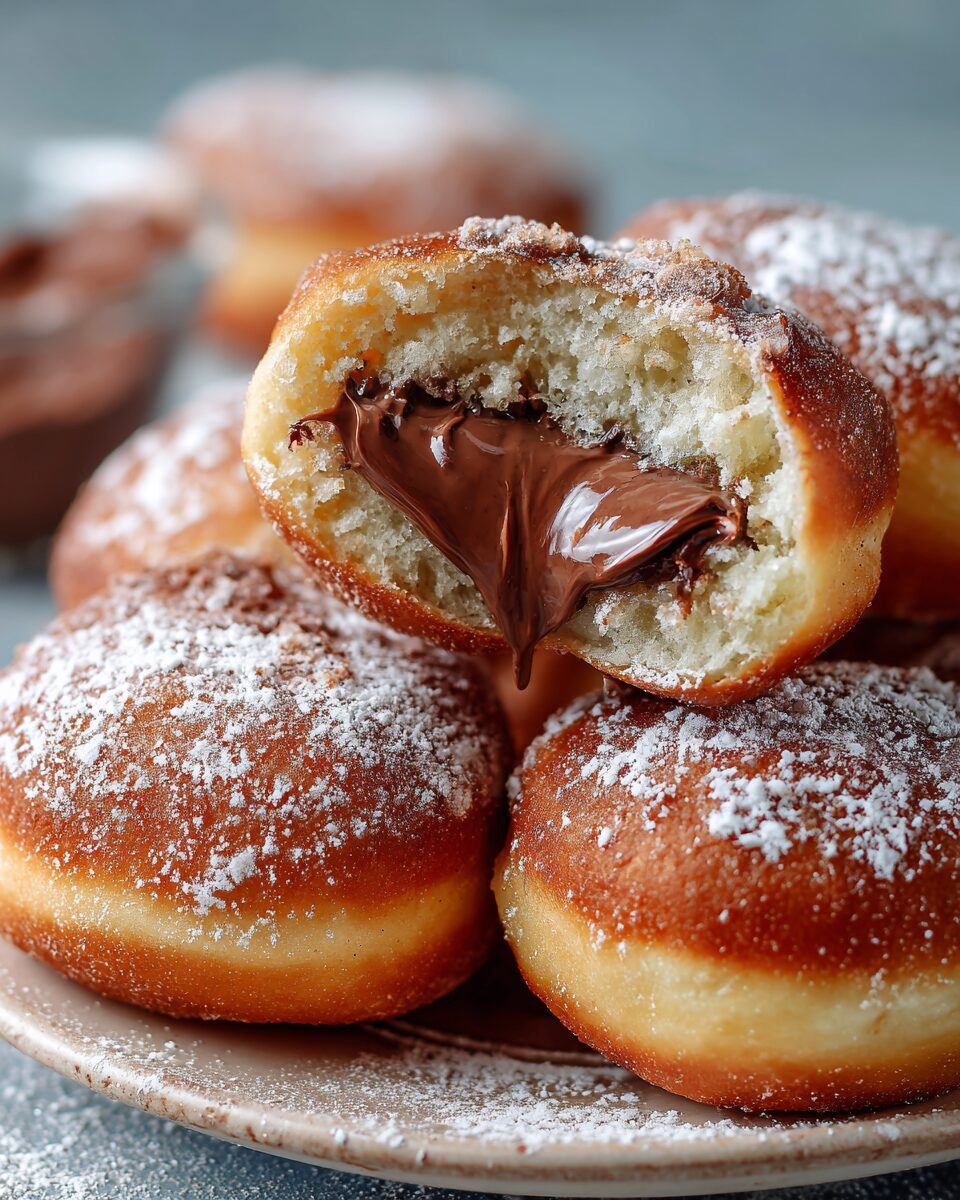
I still remember the first time I tasted a Nutella-stuffed donut. It was at a small bakery in Florence, where the scent of sugar and butter danced in the air. The baker handed me a warm donut dusted in sugar, its golden surface glistening in the morning light. I took one bite and felt an explosion of flavors — soft dough, a hint of vanilla, and that unmistakable Nutella center oozing out like molten silk. It was love at first bite.
Since then, I’ve made it my mission to recreate that perfect experience at home. And after years of testing, tweaking, and occasionally making a delicious mess, I’ve crafted this ultimate Nutella stuffed donut recipe. These donuts are everything a true indulgence should be — crisp on the outside, tender inside, and generously filled with that luscious hazelnut chocolate cream.
They’re ideal for special breakfasts, lazy weekend brunches, or just a moment of self-care with a hot cup of coffee. You can make them for birthdays, holidays, or Valentine’s Day — honestly, any occasion that deserves a little sweetness. There’s something so heartwarming about making a batch of donuts from scratch — kneading the dough, watching it rise, and filling your kitchen with that divine aroma of frying pastry and sugar.
And let’s not forget the best part — biting into one while it’s still warm and watching the Nutella slowly ooze out. It’s a sensory experience like no other.
If you’ve never made donuts before, don’t worry — this recipe walks you through each step, from preparing the yeast dough to frying it perfectly and filling it without the mess. You’ll learn not just the how, but also the why behind each step — so you can master this timeless treat with confidence.
By the end of this recipe, you’ll have a tray of golden, sugar-dusted donuts that look and taste like they came straight from a European bakery. Ready to dive in? Let’s make magic — one Nutella-stuffed donut at a time.
Full Recipe
Ingredients
For the Donut Dough
- 3 cups (375 g) all-purpose flour (plus more for dusting)
- 1 packet (2 ¼ tsp / 7 g) active dry yeast
- ¾ cup (180 ml) whole milk, warmed to 110°F (43°C)
- ¼ cup (50 g) granulated sugar
- 2 large eggs, room temperature
- ¼ cup (60 g) unsalted butter, melted
- 1 teaspoon vanilla extract
- ½ teaspoon salt
- Vegetable oil, for frying
For the Filling
- 1 cup (280 g) Nutella or other chocolate hazelnut spread
For the Coating
- ½ cup (100 g) granulated sugar
- Optional: 1 teaspoon cinnamon (for cinnamon sugar coating)
Directions
Step 1: Activate the Yeast
In a small bowl, combine warm milk and 1 tablespoon of sugar. Sprinkle the yeast over the top and let it sit for about 10 minutes, until foamy. This step ensures your yeast is alive and ready to make the dough rise.
Tip: The milk should be warm but not hot — around 110°F (43°C). Hotter milk can kill the yeast. If the mixture doesn’t foam, your yeast may be old or inactive — start again with fresh yeast.
Step 2: Prepare the Dough
In a large mixing bowl (or a stand mixer with a dough hook), combine the flour, remaining sugar, and salt. Make a well in the center and pour in the yeast mixture, melted butter, eggs, and vanilla.
Mix until the dough starts coming together, then knead for about 8–10 minutes by hand or 6–8 minutes in a mixer on medium speed. The dough should be smooth, elastic, and slightly tacky but not sticky.
Why kneading matters: Kneading builds gluten — the stretchy network that traps air and gives the donuts their light, fluffy texture.
Form the dough into a ball and place it in a lightly greased bowl. Cover with plastic wrap or a clean kitchen towel and let it rise in a warm place for about 1 to 1.5 hours, or until doubled in size.
Step 3: Shape the Donuts
Once the dough has risen, punch it down gently to release air. Transfer it onto a floured surface and roll it out to about ½ inch (1.3 cm) thickness.
Using a round cutter (2.5–3 inches wide), cut out circles. Gather the scraps, re-roll, and cut more until all dough is used. You should get around 12–14 donuts.
Place the cut donuts on parchment-lined baking sheets, leaving space between them. Cover lightly with a towel and let them rise again for 30–45 minutes until puffy.
Tip: Don’t skip this second rise — it gives the donuts their signature airy interior.
Step 4: Heat the Oil
In a deep pot or Dutch oven, pour enough vegetable oil to reach about 2 inches deep. Heat the oil to 350°F (175°C) — use a kitchen thermometer for accuracy.
Tip: Maintaining consistent oil temperature is key. If it’s too hot, the donuts will brown too quickly and stay raw inside. Too cool, and they’ll absorb oil and turn greasy.
Step 5: Fry the Donuts
Carefully place 2–3 donuts into the hot oil at a time. Fry each side for about 1 to 1½ minutes, or until golden brown.
Use a slotted spoon to transfer them to a paper towel–lined tray to drain excess oil. Continue frying the rest in batches, checking the oil temperature between rounds.
Pro Tip: Avoid overcrowding the pot — it lowers the oil temperature and prevents even cooking.
Step 6: Coat the Donuts
While still warm, roll each donut in granulated sugar (or cinnamon sugar if you like a spiced twist). The sugar will stick better when the donuts are warm.
Step 7: Fill the Donuts with Nutella
Spoon Nutella into a piping bag fitted with a long filling nozzle (or use a zip-top bag with a corner snipped).
Poke a small hole in the side or top of each donut, insert the nozzle, and gently squeeze Nutella inside until you feel resistance — about 1–2 teaspoons per donut.
Tip: Warm the Nutella slightly in the microwave (10–15 seconds) so it pipes smoothly without tearing the donut.
And there you have it — beautifully golden donuts filled with creamy, melted Nutella!
Serving Suggestions & Variations
1. Classic Presentation
Serve the donuts warm with a light dusting of powdered sugar on top. Pair them with a cappuccino or espresso for a true European-style breakfast.
2. Nutella & Strawberry Dream
Slice each donut halfway and add a layer of fresh strawberries before piping in Nutella. The tart berries perfectly complement the rich filling.
3. Nutella Mocha Donuts
Add 1 teaspoon of instant coffee granules to the dough for a subtle mocha flavor that deepens the chocolate-hazelnut richness.
4. Baked Version (for a lighter option)
Instead of frying, bake the donuts at 375°F (190°C) for about 12–15 minutes or until golden. Brush with melted butter and roll in sugar afterward. While they won’t be quite as rich as fried donuts, they’re a great lighter alternative.
5. Filled with Different Spreads
Try filling your donuts with dulce de leche, peanut butter, or chocolate ganache for a twist. Even fruit jams (like raspberry or apricot) can create fun variety on a brunch table.
6. Mini Donut Bites
Cut smaller rounds and make “mini Nutella bombs.” Perfect for parties, brunches, or kids’ treats.
Tips & Tricks
- Oil Temperature Control: Use a thermometer — the oil must stay around 350°F (175°C). Too hot burns the outside; too cool makes them oily.
- Make Ahead Option: You can prepare the dough the night before and refrigerate it. Let it come to room temperature and rise before shaping.
- Filling Tip: If you don’t have a piping nozzle, use a chopstick to create a tunnel inside each donut, then spoon or pipe the Nutella in.
- Extra Fluffy Texture: Replace 2 tablespoons of milk with heavy cream for richer dough.
- Flavor Additions: Add orange zest or a pinch of cinnamon to the dough for extra warmth.
- Storage: Store leftovers in an airtight container at room temperature for up to 2 days, or refrigerate for up to 5. Reheat in the microwave for 10 seconds before serving.
- Freezing: Freeze unfried donut rounds on a tray, then transfer to a freezer bag. Thaw, proof, and fry when needed.
- Avoid Overmixing: Mix dough until just elastic. Overworking makes it tough.
- Dusting Alternative: Instead of granulated sugar, toss warm donuts in powdered sugar for a snowy finish.
Nutritional Info (Per Donut)
(Based on 12 servings)
- Calories: ~370
- Fat: 18 g
- Saturated Fat: 8 g
- Carbohydrates: 46 g
- Sugar: 22 g
- Protein: 6 g
- Fiber: 2 g
- Sodium: 200 mg
Additional Info
- Prep Time: 25 minutes
- Rise Time: 1 hour 30 minutes
- Cooking Time: 20 minutes
- Total Time: About 2 hours 15 minutes
- Servings: 12 donuts
- Calories per Serving: ~370
Final Thoughts
Nutella Stuffed Donuts are the kind of treat that reminds us why homemade is always better. Every step — from watching the dough rise to rolling the warm donuts in sugar and watching the Nutella ooze out — feels like a celebration of simple joys.
They’re indulgent, yes, but they’re also comforting, nostalgic, and a guaranteed way to make anyone smile. Whether you’re making them for your kids on a lazy Sunday morning or serving them at brunch with friends, they’ll disappear faster than you can make them.
Donuts like these aren’t just food — they’re an experience. They’re about slowing down, enjoying the process, and creating something from scratch that brings warmth and happiness to your kitchen.
So next time you’re craving something truly special, skip the bakery and make your own Nutella Stuffed Donuts at home. One bite of that soft dough and creamy hazelnut center, and you’ll know it was worth every minute.