There’s something timeless about an ice cream sandwich. It’s the dessert of childhood summers — sticky fingers, melting edges, and the sweet satisfaction of biting through a soft cookie into cold, creamy ice cream. The first time you had one might have been from a street vendor, a family barbecue, or straight from a freezer box on a hot afternoon. That combination of chewy and creamy, sweet and cold, feels like a small miracle every time.
But if you’re living a keto or low-carb lifestyle, the traditional version — loaded with sugar, refined flour, and dairy-based ice cream — doesn’t exactly fit the plan. That’s why this Keto Ice Cream Sandwich recipe exists: to bring back all that nostalgia, joy, and indulgence — without the sugar crash or carb overload.
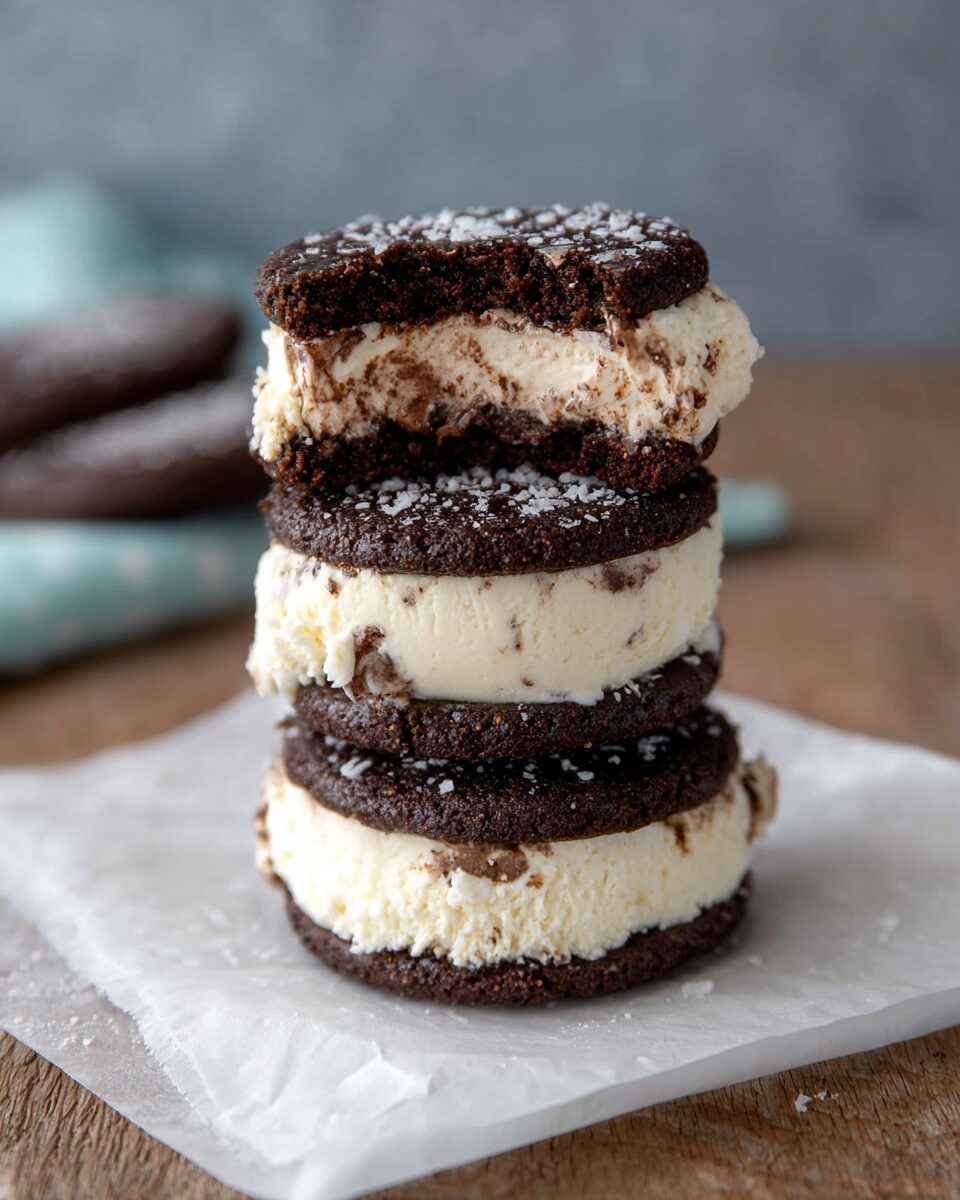
Imagine sinking your teeth into two soft, chocolatey cookies that taste like brownies and hold together a thick layer of rich, velvety vanilla ice cream. Every bite delivers a perfect contrast of temperature and texture: cool, creamy sweetness nestled between slightly warm, chewy cookies. It’s a dessert that feels playful yet sophisticated, indulgent yet balanced.
The magic of this recipe lies in its simplicity and balance. Instead of white flour, you’ll use almond flour and a touch of coconut flour for a tender, slightly nutty cookie base. Instead of sugar, erythritol, monk fruit, or allulose keep it sweet but carb-friendly. And instead of heavy, store-bought ice cream, you’ll make a smooth keto ice cream that stays creamy even after freezing — no icy, hard-to-scoop blocks here!
These sandwiches are ideal for so many occasions — family gatherings, summer picnics, or even post-workout treats when you want something that feels like a reward. They store beautifully in the freezer, and they’re so customizable you’ll find yourself experimenting with different flavors week after week: chocolate chip cookies with peanut butter ice cream, brownie cookies with strawberry filling, or even mint chocolate chip for a cool twist.
Beyond being delicious, they’re a small act of self-care — proof that living healthy doesn’t mean giving up comfort. In fact, this dessert might just redefine your idea of what a “diet-friendly” indulgence can be.
Let’s get started on the kind of treat that brings both nostalgia and satisfaction to every bite.
Full Recipe
Ingredients
For the Cookie Layers:
- 1 ½ cups (150 g) almond flour
- 2 tablespoons coconut flour
- ⅓ cup (30 g) unsweetened cocoa powder
- ½ teaspoon baking soda
- ¼ teaspoon salt
- ½ cup (113 g) unsalted butter, softened
- ¾ cup (150 g) powdered erythritol or allulose
- 1 large egg, room temperature
- 1 teaspoon pure vanilla extract
- 2 tablespoons unsweetened almond milk (to adjust consistency)
For the Keto Ice Cream Filling:
- 2 cups (480 ml) heavy cream
- 1 cup (240 ml) unsweetened almond milk
- ½ cup (100 g) allulose (preferred for creaminess) or erythritol
- 4 large egg yolks
- 1 teaspoon vanilla extract
- Pinch of salt
(Optional flavor variations listed below.)
Directions
Step 1: Make the Cookie Dough
- Preheat your oven:
Set your oven to 350°F (175°C) and line two baking sheets with parchment paper. This ensures even baking and easy removal of cookies later. - Combine dry ingredients:
In a medium mixing bowl, whisk together almond flour, coconut flour, cocoa powder, baking soda, and salt. The combination of almond and coconut flour keeps the cookies tender but structured — almond flour adds richness while coconut flour absorbs extra moisture, preventing sogginess. - Cream the butter and sweetener:
In a separate large bowl, use a hand mixer or stand mixer to beat the butter and sweetener together until light and fluffy (about 2 minutes). This step is key to achieving a soft, chewy cookie texture. - Add wet ingredients:
Mix in the egg and vanilla extract, scraping down the sides as needed. The mixture should look creamy and uniform. - Combine wet and dry:
Gradually add the dry ingredients into the butter mixture. Mix until well combined. The dough should be thick but soft. If it feels too dry, add 1–2 tablespoons of almond milk to bring it together. - Chill the dough (important):
Wrap the dough in plastic wrap and refrigerate for 20–30 minutes. This helps the fats solidify, which makes the cookies bake evenly and prevents spreading too thin.
Step 2: Shape and Bake the Cookies
- Roll out the dough:
Place the chilled dough between two sheets of parchment paper and roll it out to about ¼-inch thickness. - Cut into squares or rounds:
You can use a cookie cutter, a glass, or simply cut rectangles with a knife — traditional ice cream sandwiches are rectangular, but round ones look equally charming. - Bake:
Arrange the cookies on the lined baking sheets, spacing them about an inch apart. Bake for 8–10 minutes, or until the edges are firm but the centers are slightly soft. Remember, keto cookies continue to firm up as they cool. - Cool completely:
Allow the cookies to rest on the tray for 5 minutes before transferring to a wire rack. Cool completely before assembling.
Pro Tip: For that authentic “ice cream sandwich” look, use a fork to poke tiny holes evenly across the tops of half your cookies before baking.
Step 3: Make the Keto Ice Cream
The Vanilla Base:
- Heat the milk and cream:
In a medium saucepan, combine almond milk and heavy cream. Heat over medium-low until steaming — don’t boil. - Whisk egg yolks and sweetener:
In a separate bowl, whisk egg yolks with sweetener until pale and thick. This mixture creates the creamy custard texture that prevents ice crystallization. - Temper the yolks:
Slowly pour about ½ cup of the hot cream mixture into the yolks while whisking constantly. This gradual process prevents the eggs from scrambling. Then pour the yolk mixture back into the saucepan. - Thicken the custard:
Stir over low heat until the mixture coats the back of a spoon (about 170–175°F / 77–80°C). Do not boil. Remove from heat immediately and stir in vanilla extract and salt. - Cool and chill:
Pour through a fine mesh strainer into a clean bowl. Let cool to room temperature, then refrigerate for at least 3 hours or until thoroughly chilled. - Churn or freeze:
- If you have an ice cream maker, churn according to the manufacturer’s instructions (20–25 minutes).
- If you don’t, pour the mixture into a freezer-safe container and freeze, stirring every 30 minutes for 2–3 hours until creamy.
- Freeze until firm:
Once churned, transfer to a loaf pan, cover, and freeze for 2–4 hours until scoopable but firm.
Variation Ideas: You can make chocolate, peanut butter, or coffee versions of this ice cream base — see “Serving Variations” below.
Step 4: Assemble the Sandwiches
- Soften the ice cream slightly:
Take the ice cream out of the freezer and let it sit for 5–10 minutes to soften. This makes spreading much easier and prevents cookie breakage. - Match cookies:
Pair cookies by size. Place one cookie flat-side up and another flat-side down for each sandwich. - Add ice cream:
Spoon about ¼ cup of ice cream onto the bottom cookie. Gently press the top cookie down to spread the ice cream evenly. - Wrap and freeze:
Wrap each sandwich in parchment paper or plastic wrap and place in the freezer for 2–3 hours to set.
Step 5: Optional Finishing Touches
Once your sandwiches are set, you can decorate the edges with:
- Crushed toasted nuts (pecans, almonds, peanuts)
- Sugar-free chocolate chips
- Unsweetened coconut flakes
- Cacao nibs
- Or drizzle with melted sugar-free chocolate for a fancy touch.
These little additions not only look beautiful but add texture and fun to every bite.
Serving Suggestions & Variations
1. Classic Vanilla Ice Cream Sandwich
Simple and timeless — vanilla ice cream between chocolate cookies. It’s the keto-friendly version of your childhood favorite.
2. Chocolate Lovers’ Dream
Add 2 tablespoons unsweetened cocoa powder to your ice cream base before churning, or swirl in melted sugar-free chocolate for ribbons of fudge throughout.
3. Peanut Butter Bliss
Mix 2 tablespoons natural peanut butter into the ice cream base, or use peanut butter ice cream between the chocolate cookies. Sprinkle crushed peanuts on the sides for crunch.
4. Mint Chocolate Chip
Add ½ teaspoon peppermint extract and ¼ cup sugar-free chocolate chips to your ice cream base. The refreshing mint flavor pairs beautifully with the cocoa cookies.
5. Berry Cheesecake Sandwiches
Blend 2 tablespoons cream cheese and ¼ cup raspberries or strawberries into your ice cream base before freezing for a fruity, creamy twist.
6. Coffee & Cream Sandwiches
Dissolve 1 teaspoon instant espresso powder into the warm milk mixture when making the ice cream base. The subtle coffee bitterness enhances the chocolate flavor of the cookies.
Tips & Tricks
- Use Allulose for Soft Ice Cream:
Allulose doesn’t crystallize when frozen, so your ice cream stays creamy and scoopable. - Let the Ice Cream Soften:
Before assembling, let your ice cream soften for 5–10 minutes — cold ice cream will crack the cookies. - Don’t Overbake Cookies:
Keto cookies harden as they cool. Take them out while they’re still slightly soft in the center to keep them chewy. - For Perfect Shapes:
If you want bakery-style neat edges, freeze the ice cream in a baking pan, then cut into squares using a cookie cutter to match the cookie shape. - Storage:
Wrap each sandwich individually and store in an airtight container for up to 2 weeks in the freezer. - Quick Softening Trick:
If the sandwiches are too firm, leave them at room temperature for 5 minutes before serving — the texture becomes perfectly chewy and creamy. - Flavor Boosters:
Add a pinch of espresso powder, sea salt, or even cinnamon to your cookie dough to enhance the chocolate notes.
Nutritional Info (Per Sandwich)
(Approximate values based on vanilla ice cream filling and almond flour cookies.)
- Calories: 290
- Fat: 26 g
- Protein: 7 g
- Total Carbohydrates: 8 g
- Fiber: 4 g
- Net Carbs: 4 g
- Sugar: 1 g
Additional Info
- Prep Time: 30 minutes (plus chilling)
- Cooking Time: 10 minutes
- Freezing Time: 4–5 hours
- Total Time: ~6 hours
- Servings: 10 sandwiches
- Calories per Serving: ~290
Final Thoughts
These Keto Ice Cream Sandwiches are more than just a dessert — they’re a celebration of creativity and balance. They bring together the best of two worlds: the comforting nostalgia of a childhood classic and the mindful, low-carb lifestyle of today. Every detail — from the soft, chewy cookies to the creamy, melt-in-your-mouth ice cream — proves that indulgence doesn’t have to mean compromise.
They’re ideal for make-ahead desserts, weekend treats, or just a little moment of joy after a long day. You can keep them simple or go all out with flavor experiments — because once you master the base recipe, the possibilities are endless.
Whether you’re sharing them with your family on a warm afternoon or savoring one solo with a cup of coffee, these sandwiches are pure happiness frozen between two cookies. They’re proof that keto desserts can be both wholesome and magical.
So grab your mixing bowls, chill your cream, and get ready to make your freezer a little sweeter. Because when life gets busy, there’s nothing better than knowing a batch of keto ice cream sandwiches is waiting for you — cool, creamy, and perfectly delicious.