There are few desserts as universally adored as cheesecake — that silky smooth texture, that decadent richness, that perfect balance between creamy and dense. But what if you could enjoy all of that indulgence without the sugar, without the baking, and without the guilt? Enter the Chocolate No-Bake Keto Cheesecake, a masterpiece for anyone following a low-carb or ketogenic lifestyle — or simply anyone who loves chocolate and comfort in a single, luscious bite.
This cheesecake is the ultimate example of how modern keto baking (or, in this case, non-baking) has evolved. Years ago, being on a keto diet meant saying goodbye to your favorite desserts. Sugar was out, flour was off-limits, and traditional sweets were a thing of the past. But today, with the rise of natural sweeteners like erythritol, monk fruit, and allulose, and a deeper understanding of how to balance fats and textures, it’s possible to create desserts that feel every bit as luxurious as their high-carb counterparts.
This particular recipe was inspired by the craving for something decadent but effortless. There’s no water bath, no cracked tops, and no endless waiting for a cheesecake to cool. Just smooth, rich, chocolate perfection that comes together in about 20 minutes and chills while you go about your day.
The first bite of this no-bake keto cheesecake is pure bliss: a velvety, mousse-like filling that melts in your mouth, anchored by a buttery, slightly crunchy crust made from almond flour and cocoa powder. The flavor is bold — deep chocolate notes with a subtle hint of vanilla and cream cheese tang — yet it’s balanced enough that even non-keto friends will rave about it.
It’s perfect for holidays, dinner parties, or even those moments when you simply want to treat yourself after a long day. And the best part? You’ll never feel deprived. This dessert proves that keto can be indulgent, elegant, and absolutely satisfying.
Let’s dive into how to make this creamy dream of a cheesecake — no oven required, no guilt included.
Full Recipe
Ingredients
For the Chocolate Crust:
- 1 ½ cups (150 g) almond flour
- 3 tablespoons unsweetened cocoa powder
- ¼ cup (55 g) melted butter
- 3 tablespoons powdered erythritol (or monk fruit blend)
- ½ teaspoon vanilla extract
- Pinch of sea salt
For the Chocolate Cheesecake Filling:
- 16 oz (450 g) cream cheese, softened
- 1 cup (240 ml) heavy whipping cream
- ¾ cup (75 g) unsweetened cocoa powder
- ½ cup (100 g) powdered erythritol or allulose (adjust to taste)
- ½ teaspoon vanilla extract
- ¼ teaspoon instant espresso powder (optional, enhances chocolate flavor)
- Pinch of salt
- Optional: 2 oz (56 g) sugar-free dark chocolate, melted and cooled, for extra richness
For the Chocolate Ganache Topping (Optional but heavenly):
- ½ cup (120 ml) heavy cream
- 2 oz (56 g) sugar-free dark chocolate, finely chopped
- 1 teaspoon butter (for glossiness)
Directions
Step 1: Prepare the Crust
- Combine dry ingredients:
In a medium mixing bowl, whisk together the almond flour, cocoa powder, erythritol, and salt. Make sure there are no lumps — this helps ensure a smooth, even crust. - Add wet ingredients:
Pour in the melted butter and vanilla extract. Mix with a fork or spatula until the texture resembles damp sand. The butter acts as both a binder and a flavor enhancer, while the almond flour provides that nutty, shortbread-like structure. - Press into pan:
Pour the crust mixture into a 9-inch (23 cm) springform pan. Use the back of a spoon or the bottom of a flat measuring cup to firmly press it down into an even layer. A tight, compact crust prevents it from crumbling when sliced. - Chill the crust:
Place the pan in the refrigerator or freezer for 15–20 minutes to firm up while you prepare the filling. This helps the butter solidify and keeps the base stable when you pour in the cheesecake mixture.
Tip: For an extra chocolate boost, sprinkle a few sugar-free chocolate chips over the crust before adding the filling.
Step 2: Make the Chocolate Cheesecake Filling
- Whip the cream:
In a large bowl, use an electric mixer to beat the heavy whipping cream until stiff peaks form. This gives the cheesecake its airy, mousse-like texture. Set aside. - Blend the cream cheese:
In another large mixing bowl, beat the softened cream cheese until smooth and fluffy (about 2–3 minutes). This step is essential for achieving that silky consistency — cold cream cheese will create lumps, so make sure it’s room temperature. - Add the flavorings:
Add erythritol, cocoa powder, vanilla extract, salt, and espresso powder (if using). Beat until well combined and the mixture is creamy and uniform. - Add melted chocolate (optional):
If you’re using melted dark chocolate, pour it in now while mixing. This adds depth and a more intense chocolate flavor, creating that luscious “truffle” richness. - Fold in the whipped cream:
Gently fold the whipped cream into the chocolate mixture using a spatula. Do this in two or three additions to maintain the airy texture. The goal is to keep it light and fluffy, not deflate it. - Taste and adjust:
Taste your mixture before pouring it over the crust. If you prefer a sweeter cheesecake, add another tablespoon of powdered sweetener and fold gently.
Step 3: Assemble the Cheesecake
- Spread the filling:
Pour the chocolate cheesecake filling over the chilled crust. Use an offset spatula to spread it evenly and smooth the top. - Chill:
Cover the pan with plastic wrap and refrigerate for at least 4 hours, or preferably overnight. This allows the cheesecake to set properly and develop a perfect texture — firm yet creamy. - Optional ganache topping:
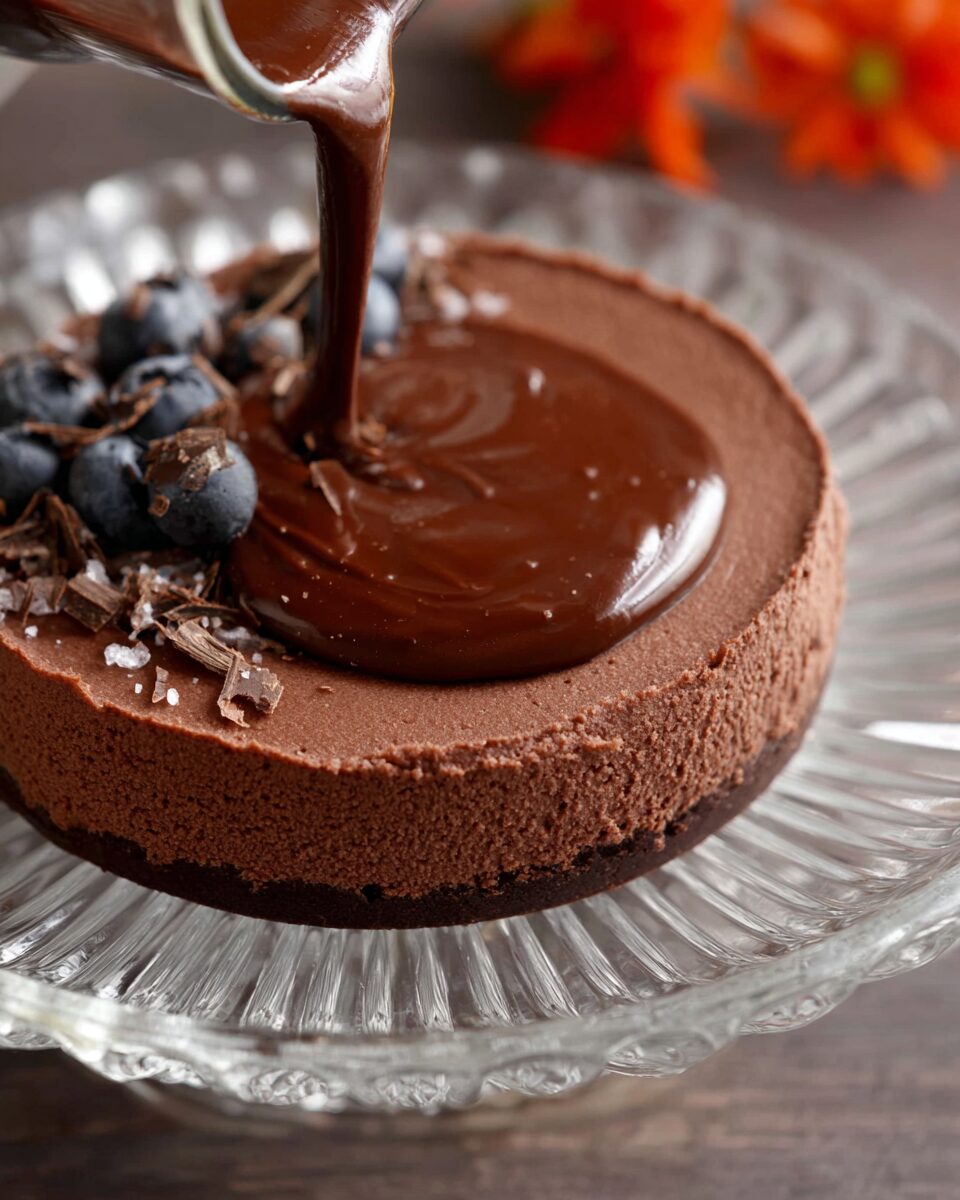
To make the ganache, heat heavy cream in a small saucepan until just steaming (don’t boil). Pour it over the chopped sugar-free chocolate, let it sit for a minute, then whisk until glossy and smooth. Stir in butter for extra shine.Pour the ganache over the chilled cheesecake and spread it evenly. Return it to the fridge for 30 minutes to set.
Step 4: Serve and Enjoy
Run a knife around the edges before releasing the springform pan. Slice with a warm knife (dip it in hot water and wipe dry before cutting each piece). Serve chilled with a dollop of whipped cream, shaved chocolate, or fresh raspberries for a pop of color and freshness.
Each bite delivers that indulgent combination of rich chocolate, cool creaminess, and a buttery almond crust — satisfaction without compromise.
Serving Suggestions & Variations
1. Classic Chocolate Elegance
Serve with a few curls of sugar-free dark chocolate on top and a dusting of cocoa powder. Perfect for formal dinners or romantic nights in.
2. Mocha Cheesecake
Add 1 teaspoon of espresso powder and drizzle with a sugar-free coffee glaze. The combination of coffee and chocolate creates a sophisticated flavor that coffee lovers will adore.
3. Raspberry Chocolate Swirl
Before chilling, spoon a few dollops of sugar-free raspberry jam onto the cheesecake filling and swirl gently with a toothpick for a beautiful marbled effect.
4. Peanut Butter Chocolate Cheesecake
Stir 2 tablespoons of natural unsweetened peanut butter into the filling and top with crushed peanuts or sugar-free peanut butter cups for a Reese’s-inspired treat.
5. Coconut Chocolate Cheesecake
Mix ¼ cup shredded unsweetened coconut into the crust and sprinkle some toasted coconut flakes on top. This adds a lovely texture and tropical twist.
6. Dairy-Free Version
Use coconut cream instead of heavy cream and dairy-free cream cheese for a lactose-free variation. The result is just as creamy and rich.
Tips & Tricks
- Sweetener Selection:
Allulose creates the smoothest texture with no graininess, while erythritol gives a slightly firmer consistency. Monk fruit blends are great for sweetness without aftertaste. - Softening Cream Cheese:
Leave cream cheese at room temperature for 30–45 minutes before starting. Microwave for 10 seconds if you’re in a hurry (but don’t melt it). - Avoid Overmixing:
When folding in whipped cream, do it slowly and gently. Overmixing can cause the filling to lose its airy, mousse-like consistency. - Make Ahead:
This cheesecake keeps beautifully in the fridge for up to 5 days and freezes well for up to 2 months. Just thaw overnight in the fridge before serving. - Perfect Slice Technique:
Use a sharp knife dipped in hot water, wipe clean after each cut. This gives you those perfect, bakery-style slices. - Adding Gelatin (optional):
If you prefer a firmer set, dissolve 1 teaspoon of unflavored gelatin in 2 tablespoons of hot water and mix it into the cream cheese before folding in the whipped cream.
Nutritional Info (per serving, based on 12 slices)
- Calories: 340
- Fat: 32 g
- Protein: 6 g
- Total Carbohydrates: 6 g
- Fiber: 3 g
- Net Carbs: 3 g
- Sugar: 1 g
(Nutritional values vary based on brands and optional ingredients.)
Additional Info
- Prep Time: 25 minutes
- Cooking Time: 0 minutes
- Chilling Time: 4–6 hours
- Total Time: 4 hours 30 minutes
- Servings: 12 slices
- Calories per Serving: ~340
Final Thoughts
This Chocolate No-Bake Keto Cheesecake is proof that living low-carb doesn’t mean giving up indulgence. It’s silky, deeply chocolatey, and beautifully balanced — the kind of dessert that feels as good to make as it does to eat. Whether you’re hosting a dinner party, celebrating a special occasion, or just treating yourself on a quiet evening, this cheesecake fits every moment.
Each slice feels luxurious — cool, smooth, and decadently rich — yet it keeps you within your goals. It’s the perfect marriage between health-conscious and hedonistic.
Make it once, and it will quickly earn a place in your dessert rotation. Experiment with flavors, toppings, and textures, and soon, it’ll become your signature keto dessert — the one friends ask for again and again.
So go ahead — grab that whisk, melt that chocolate, and let your fridge do the rest. Because some desserts don’t need an oven; they just need love, patience, and a little creativity.